This document is a blow by blow walkthrough of the tutorial quest “Moth to a Flame”. Feel free to step through each encounter with the components or just use this as a guide and play through the quest as is. Each tutorial is designed to introduce the rules in an orderly fashion, to prepare you for the longer quests.
Heroes
At the start of any session you must choose a Hero. Turn to the back of the Hero card, read through the background and collect the various Hero Accoutrement detailed in “Suggested Set Up”. This will include a specific weapon, gear and a single virtuosity or familiar.
Choose either Vixen or Volken for your first quest.
Vixen the Wildwood Wanderer takes up the mantle of Hero for our quest
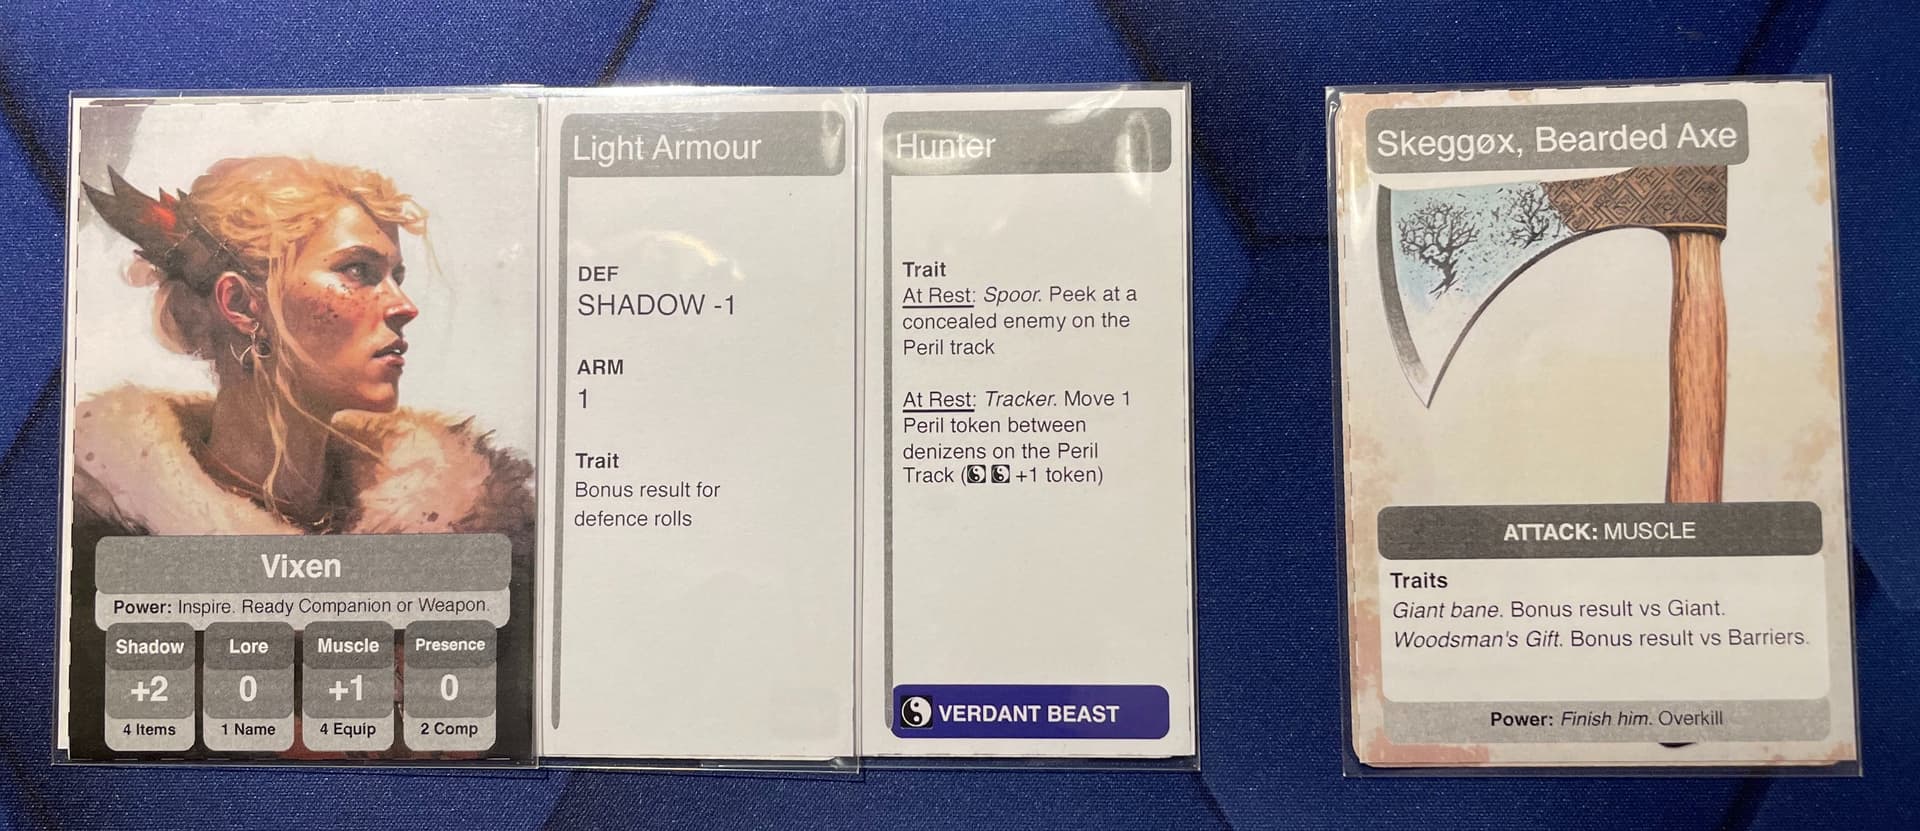
Hero Setup
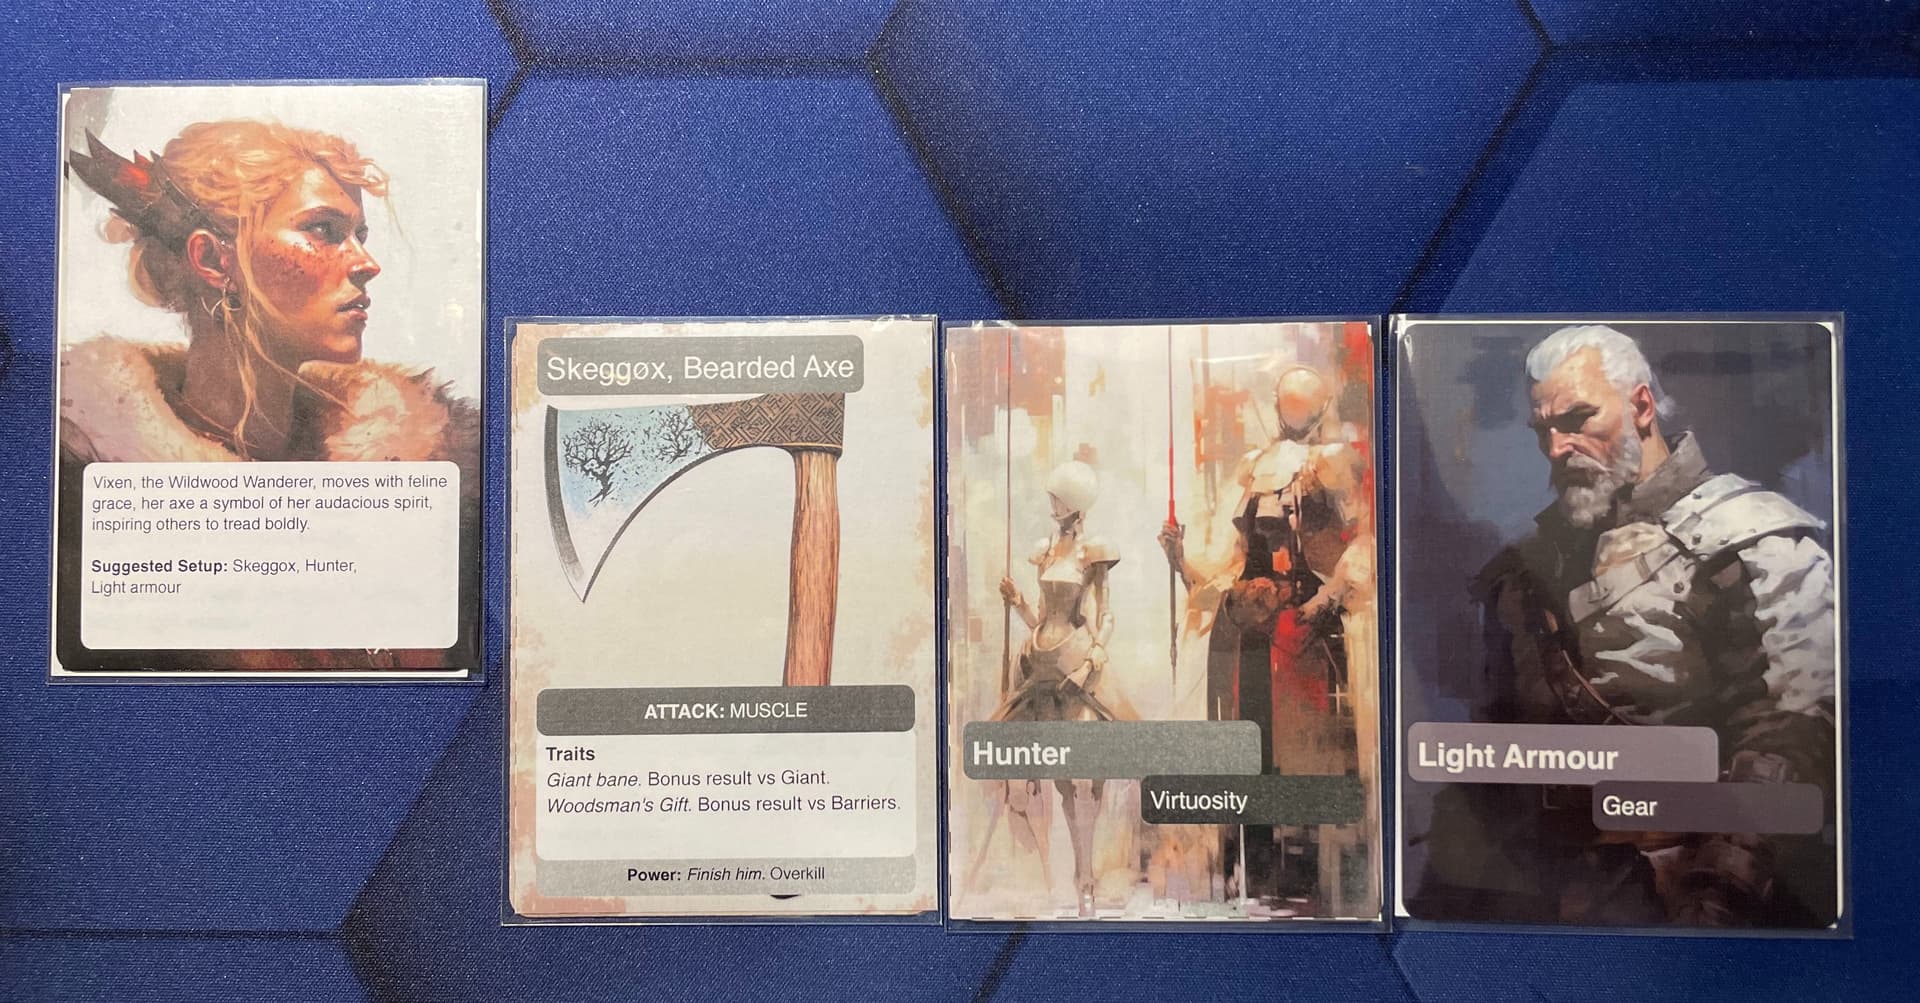
Gear, virtuosities and familiars are attached to the Hero card and the Weapon card is placed adjacent. Both the Hero and Weapon cards have Traits and Powers activate independently of each other.
Your selected Quest will have additional Hero set up requirements. These will be applied to your Hero tableau during the Quest setup.
Note, in future quests you would supplement your Hero with an accoutrement from Past Lives, but these steps will be ignored for the Tutorials.
Hit Points, Grit, Memories & Combat Tracker
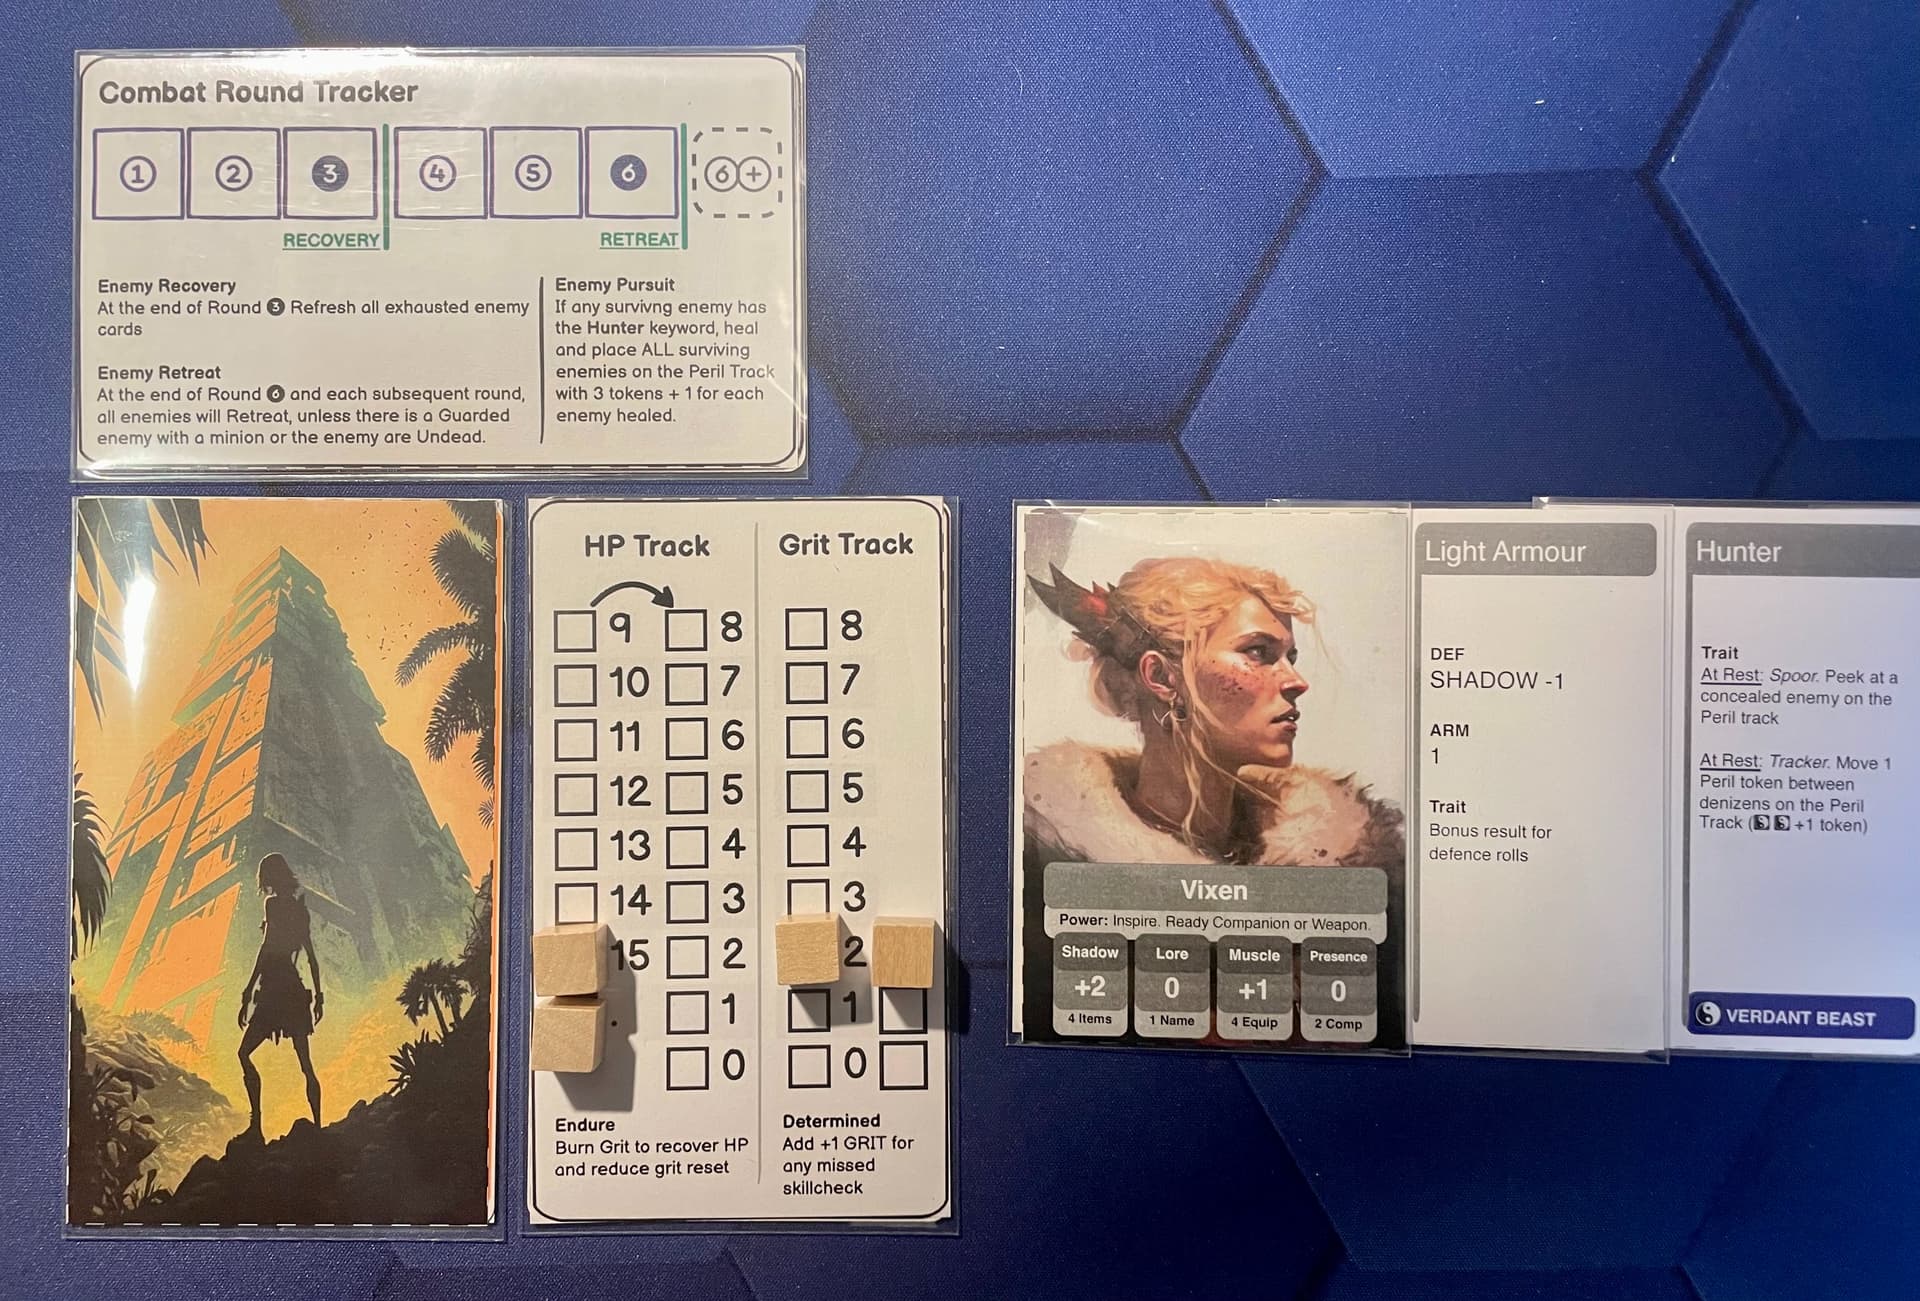
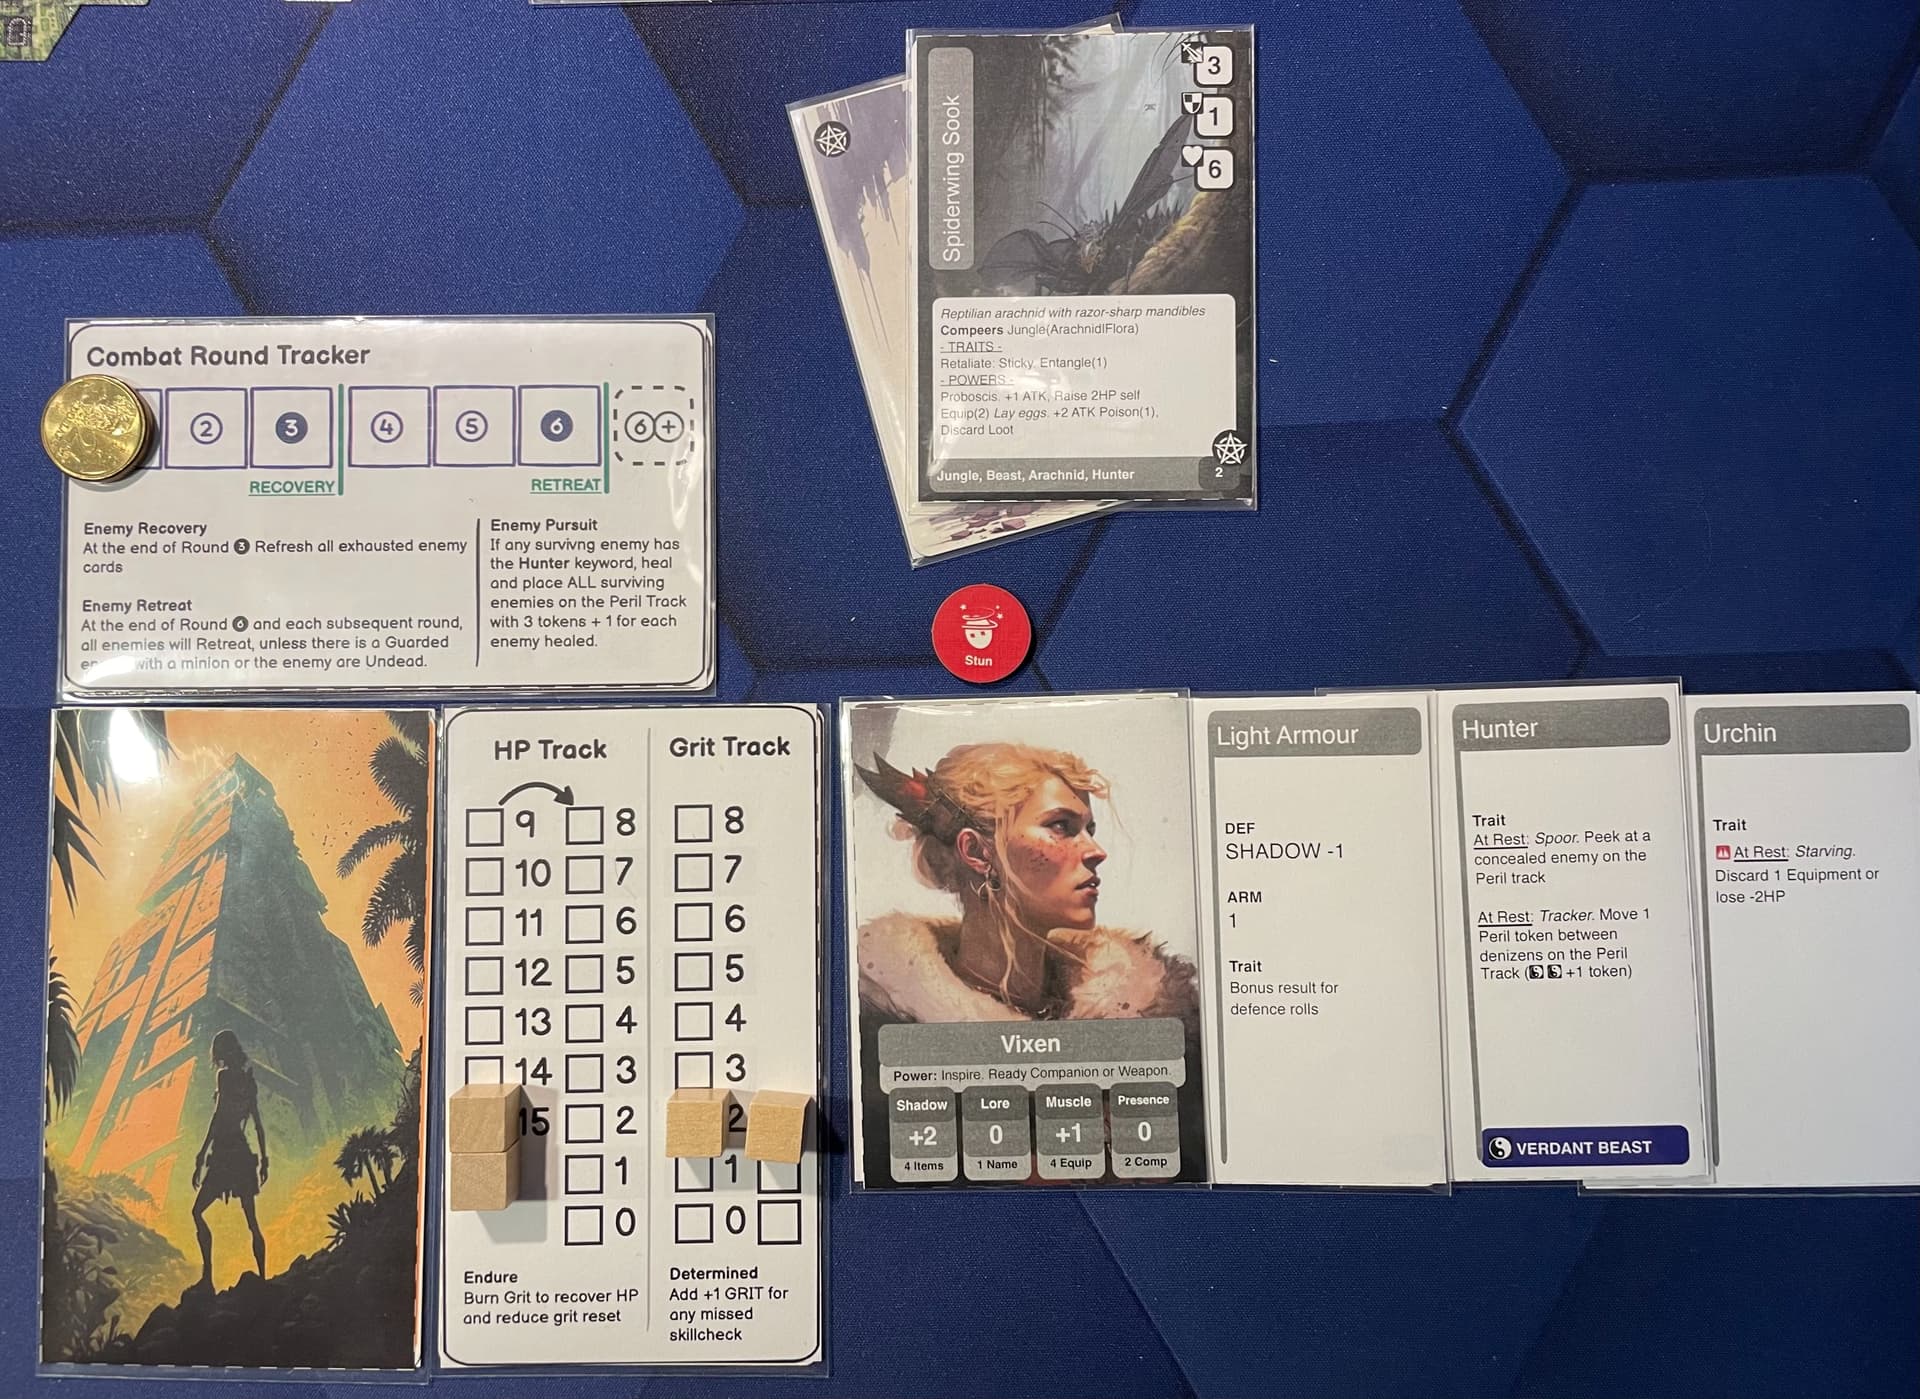
Place a cube on the Max HP (black square above 15) and Starting HP at 15. And place a cube on the Grit track at 2 and another on the grit reset track at 2.
Place the Combat Round Tracker nearby; it will be needed if you encounter something nasty on your journey.
We won’t be using the Lived Experience tracker for the tutorial so flip it upside down or remove.
Quests
Each Quest consists of three small card decks; the quest, threat and peril decks.
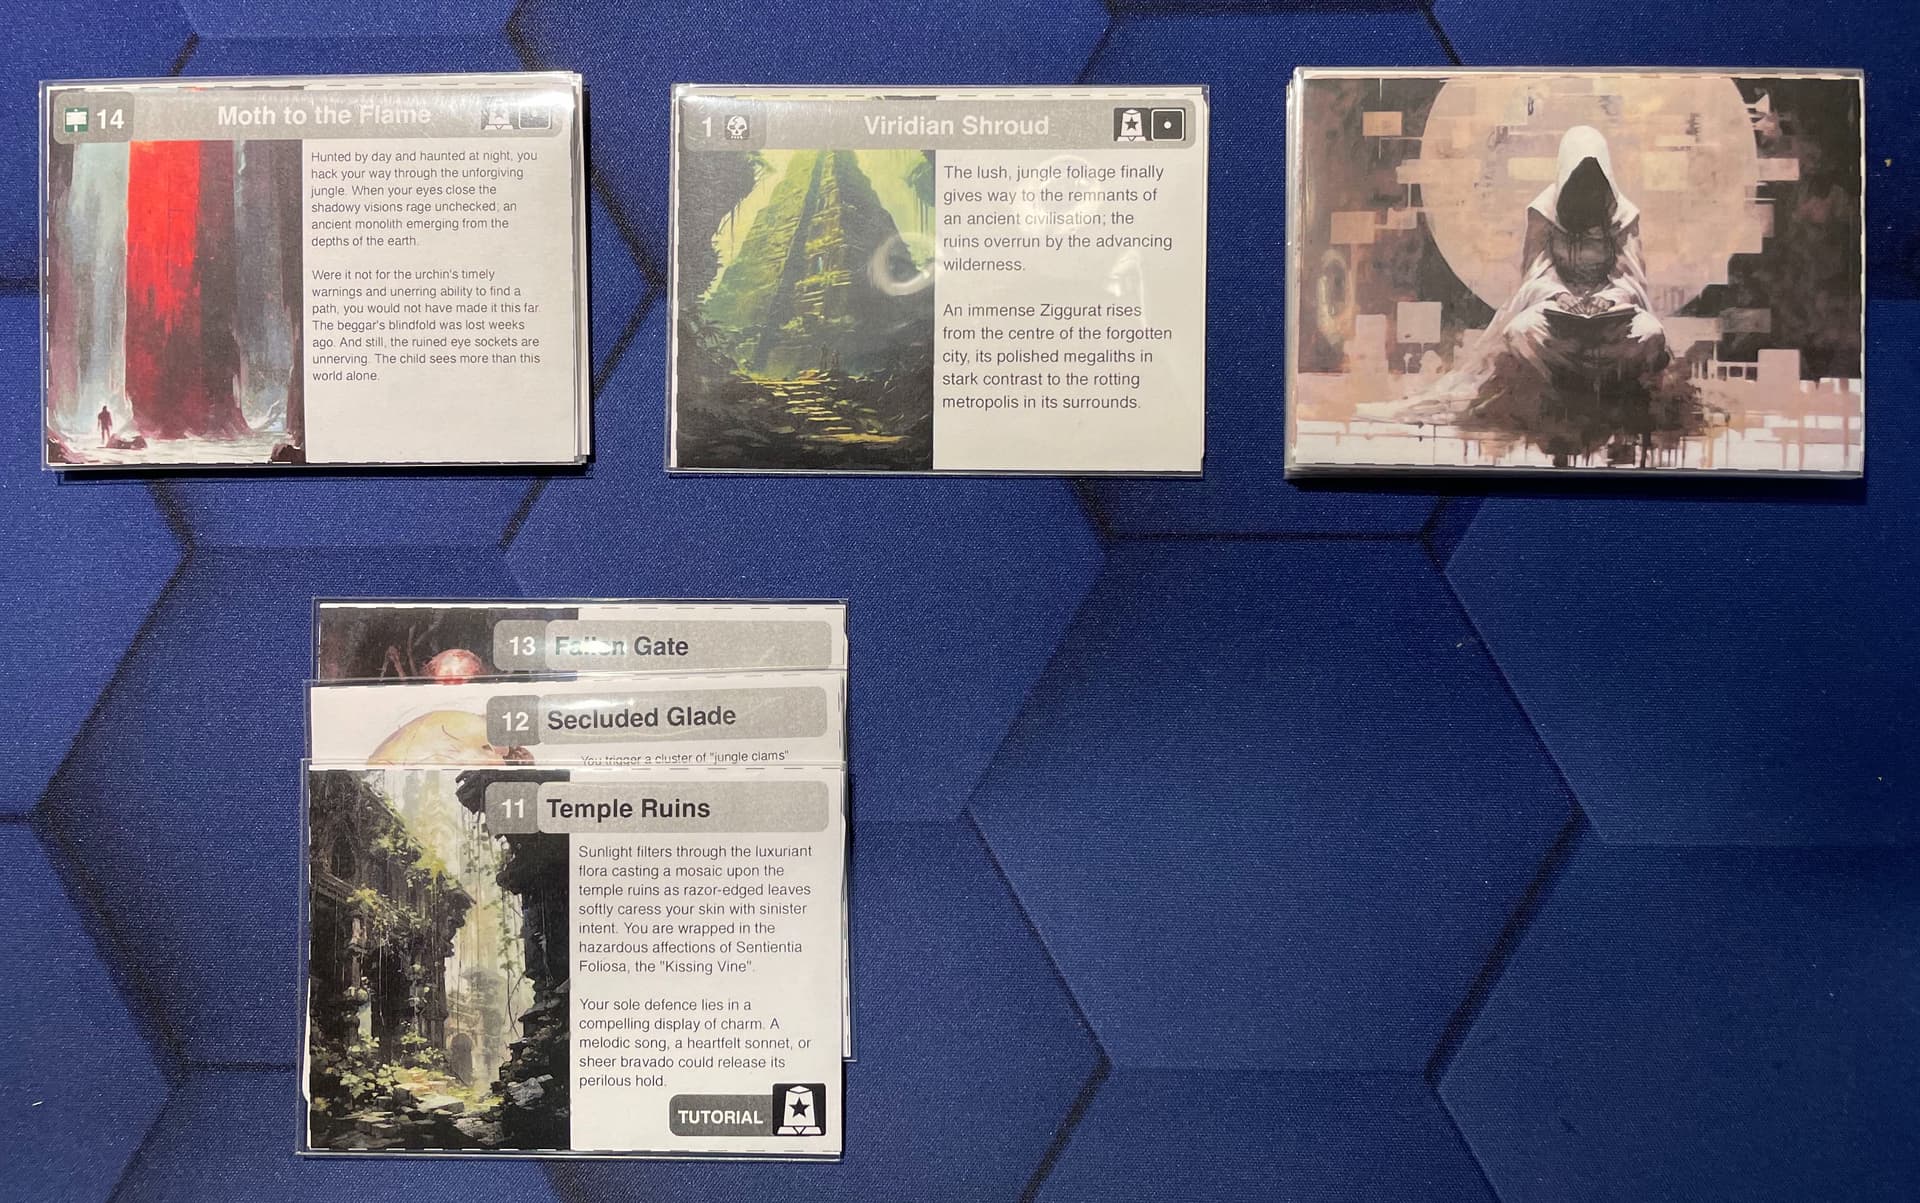
The Quest Deck is 3-5 cards and is kept in strict numeric order. It forms the driving narrative for your play session, outlining the purpose and victory conditions for your Hero.
The Threat Deck is 1-3 cards and is kept in strict numeric order. It represents the danger of the Ziggurat, and may introduce Quest specific rule changes, and an increasing element of danger for your quest environment.
The Peril Deck for every Quest is a combination of 6 standard Peril cards, and a set of 9 Peril Cards specific to the quest itself. These are shuffled together at the start of the Quest to form the Peril Deck. However, the tutorial quests are much shorter, and do not have any additional peril cards to include in the peril deck – just the 6 standard Peril cards.
Tutorial Location Encounters
The Ziggurat has a large deck of Location Encounters that are drawn upon throughout a quest. However, the Tutorial quests use a specific set of Location Encounters instead. These encounters are badged with the Quest icon for easy identification and should be set aside for use during the Tutorial.
Quest Setup
Read the first Quest card for a brief intro to your adventure, then turn over to complete the Quest Set Up.
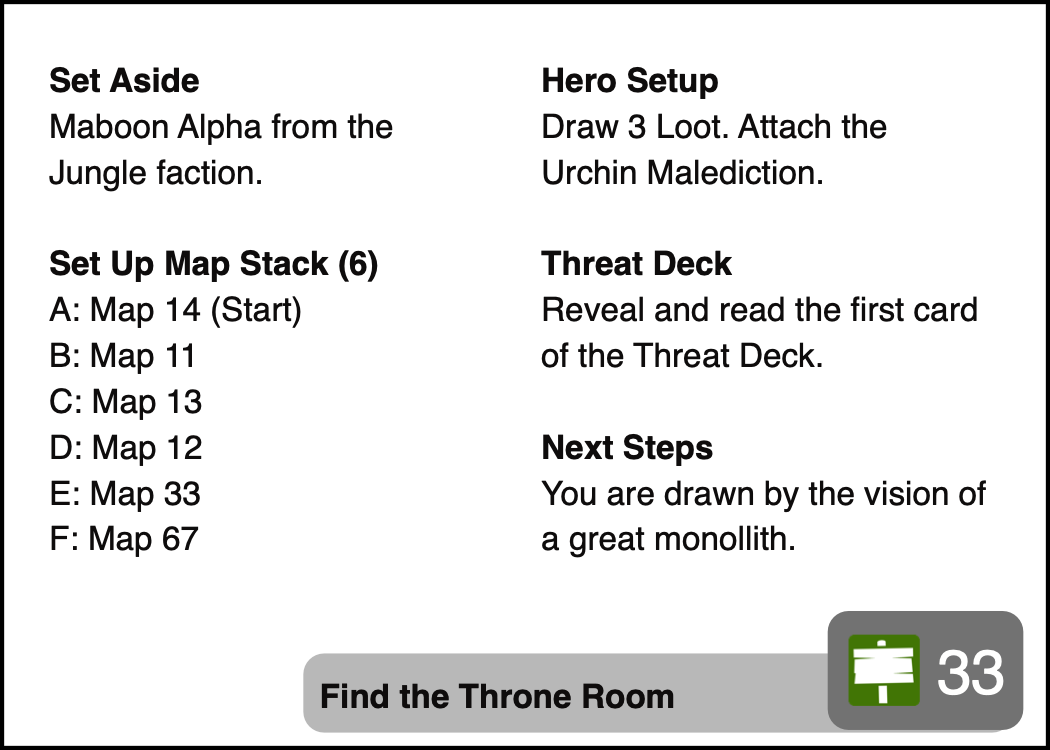
Set Aside
You may be asked to Set Aside cards that will be used later in the Quest. For the Tutorial, search the Jungle faction deck and set aside the Maboon Alpha.
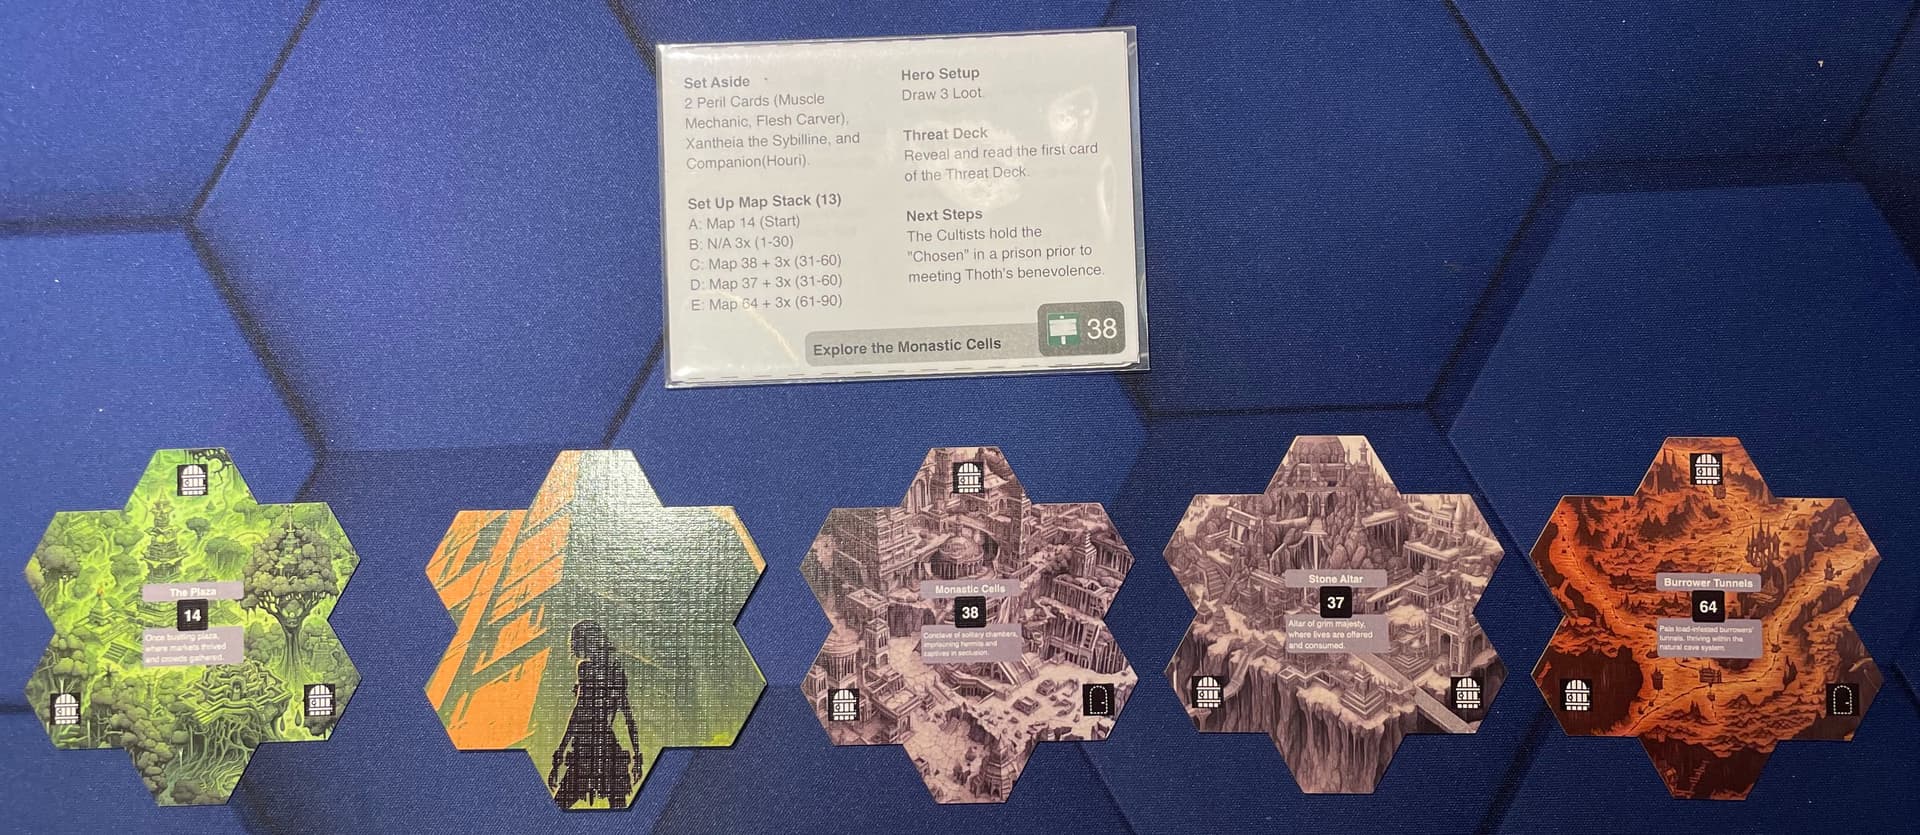
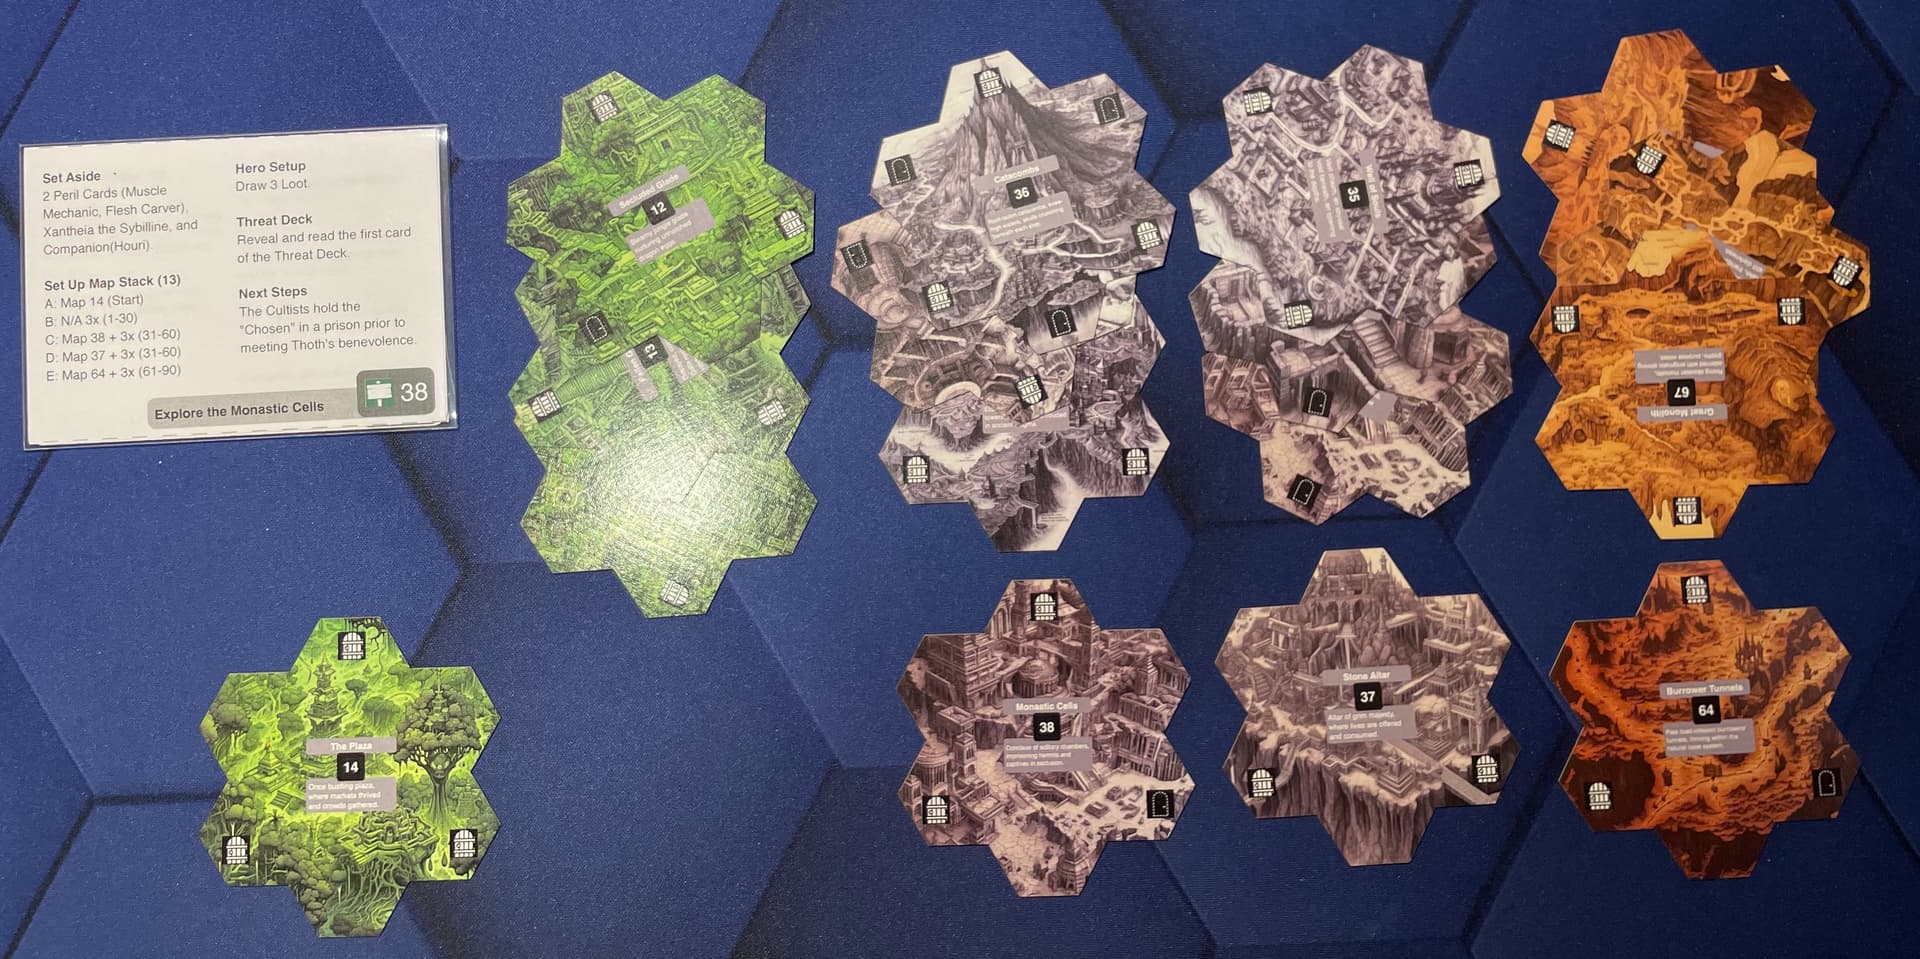
Map Stack
The Map stack is a set of tiles that you will explore during the course of your adventure. The quest will instruct which tiles should be included. The Tutorial has a specific list of tiles to be stacked in a set order.
Note, standard quests have a more elaborate setup consisting of key tiles with random tile sets. The Tutorial is set up to reduce the variability of the quest map for teaching purposes.
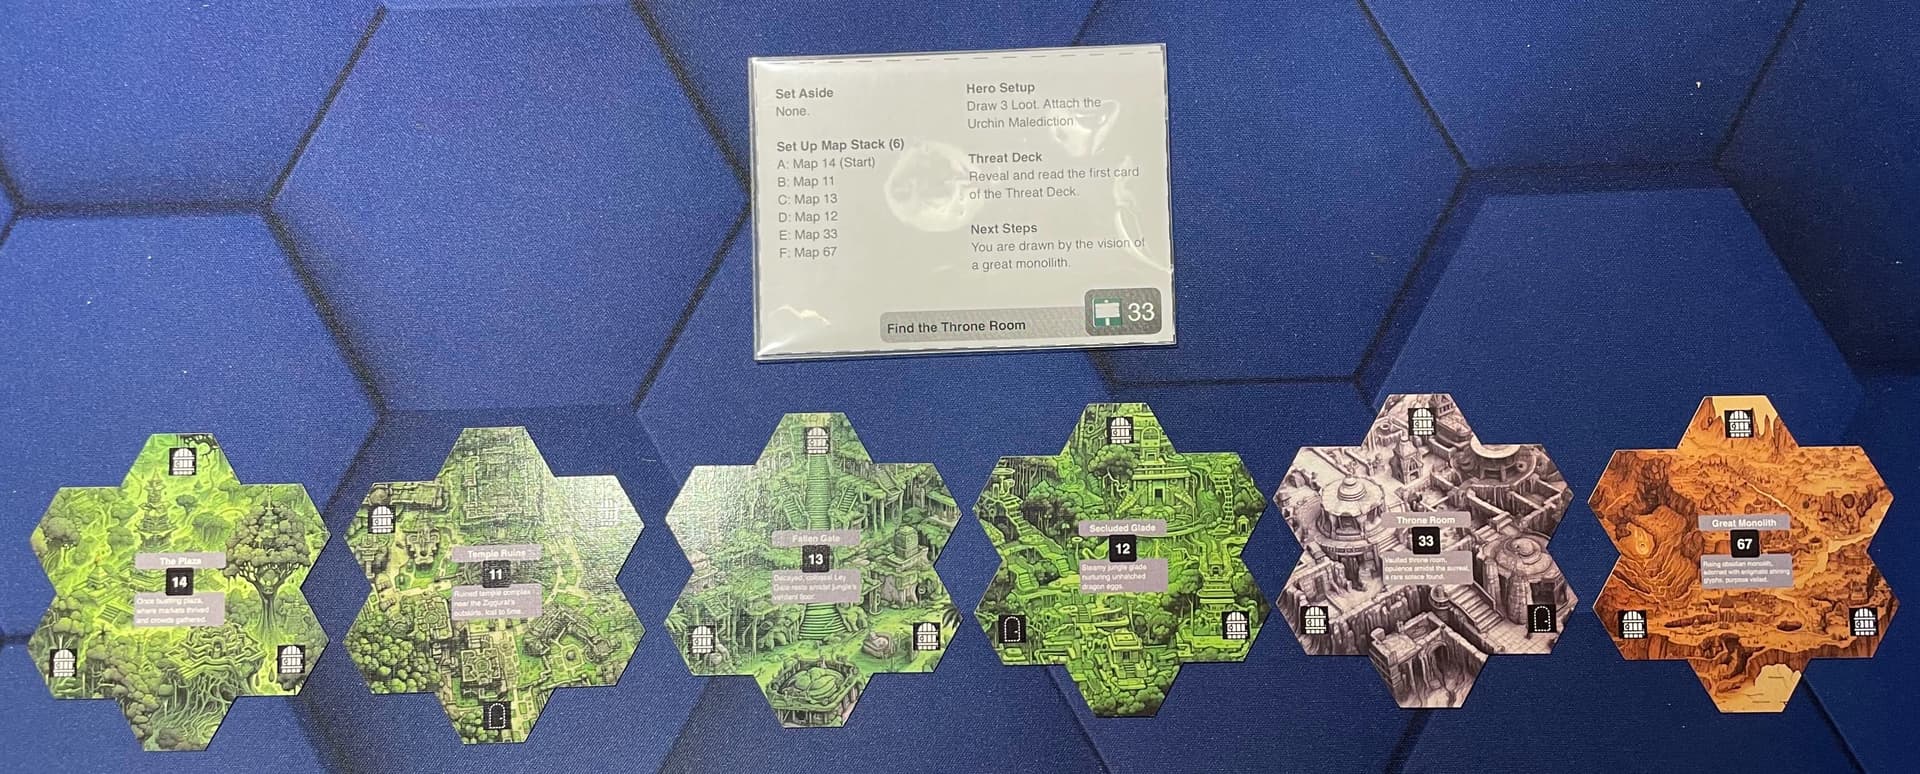
Lay out the key tiles and prepare each sub-stack (A-F). For the first tutorial these are all stacks of one tile. Then arrange the sub-stacks into a single stack with A at the top and F at the bottom.
Hero setup
The Quest asks you to attach the Urchin Malediction and draw three Loot cards.
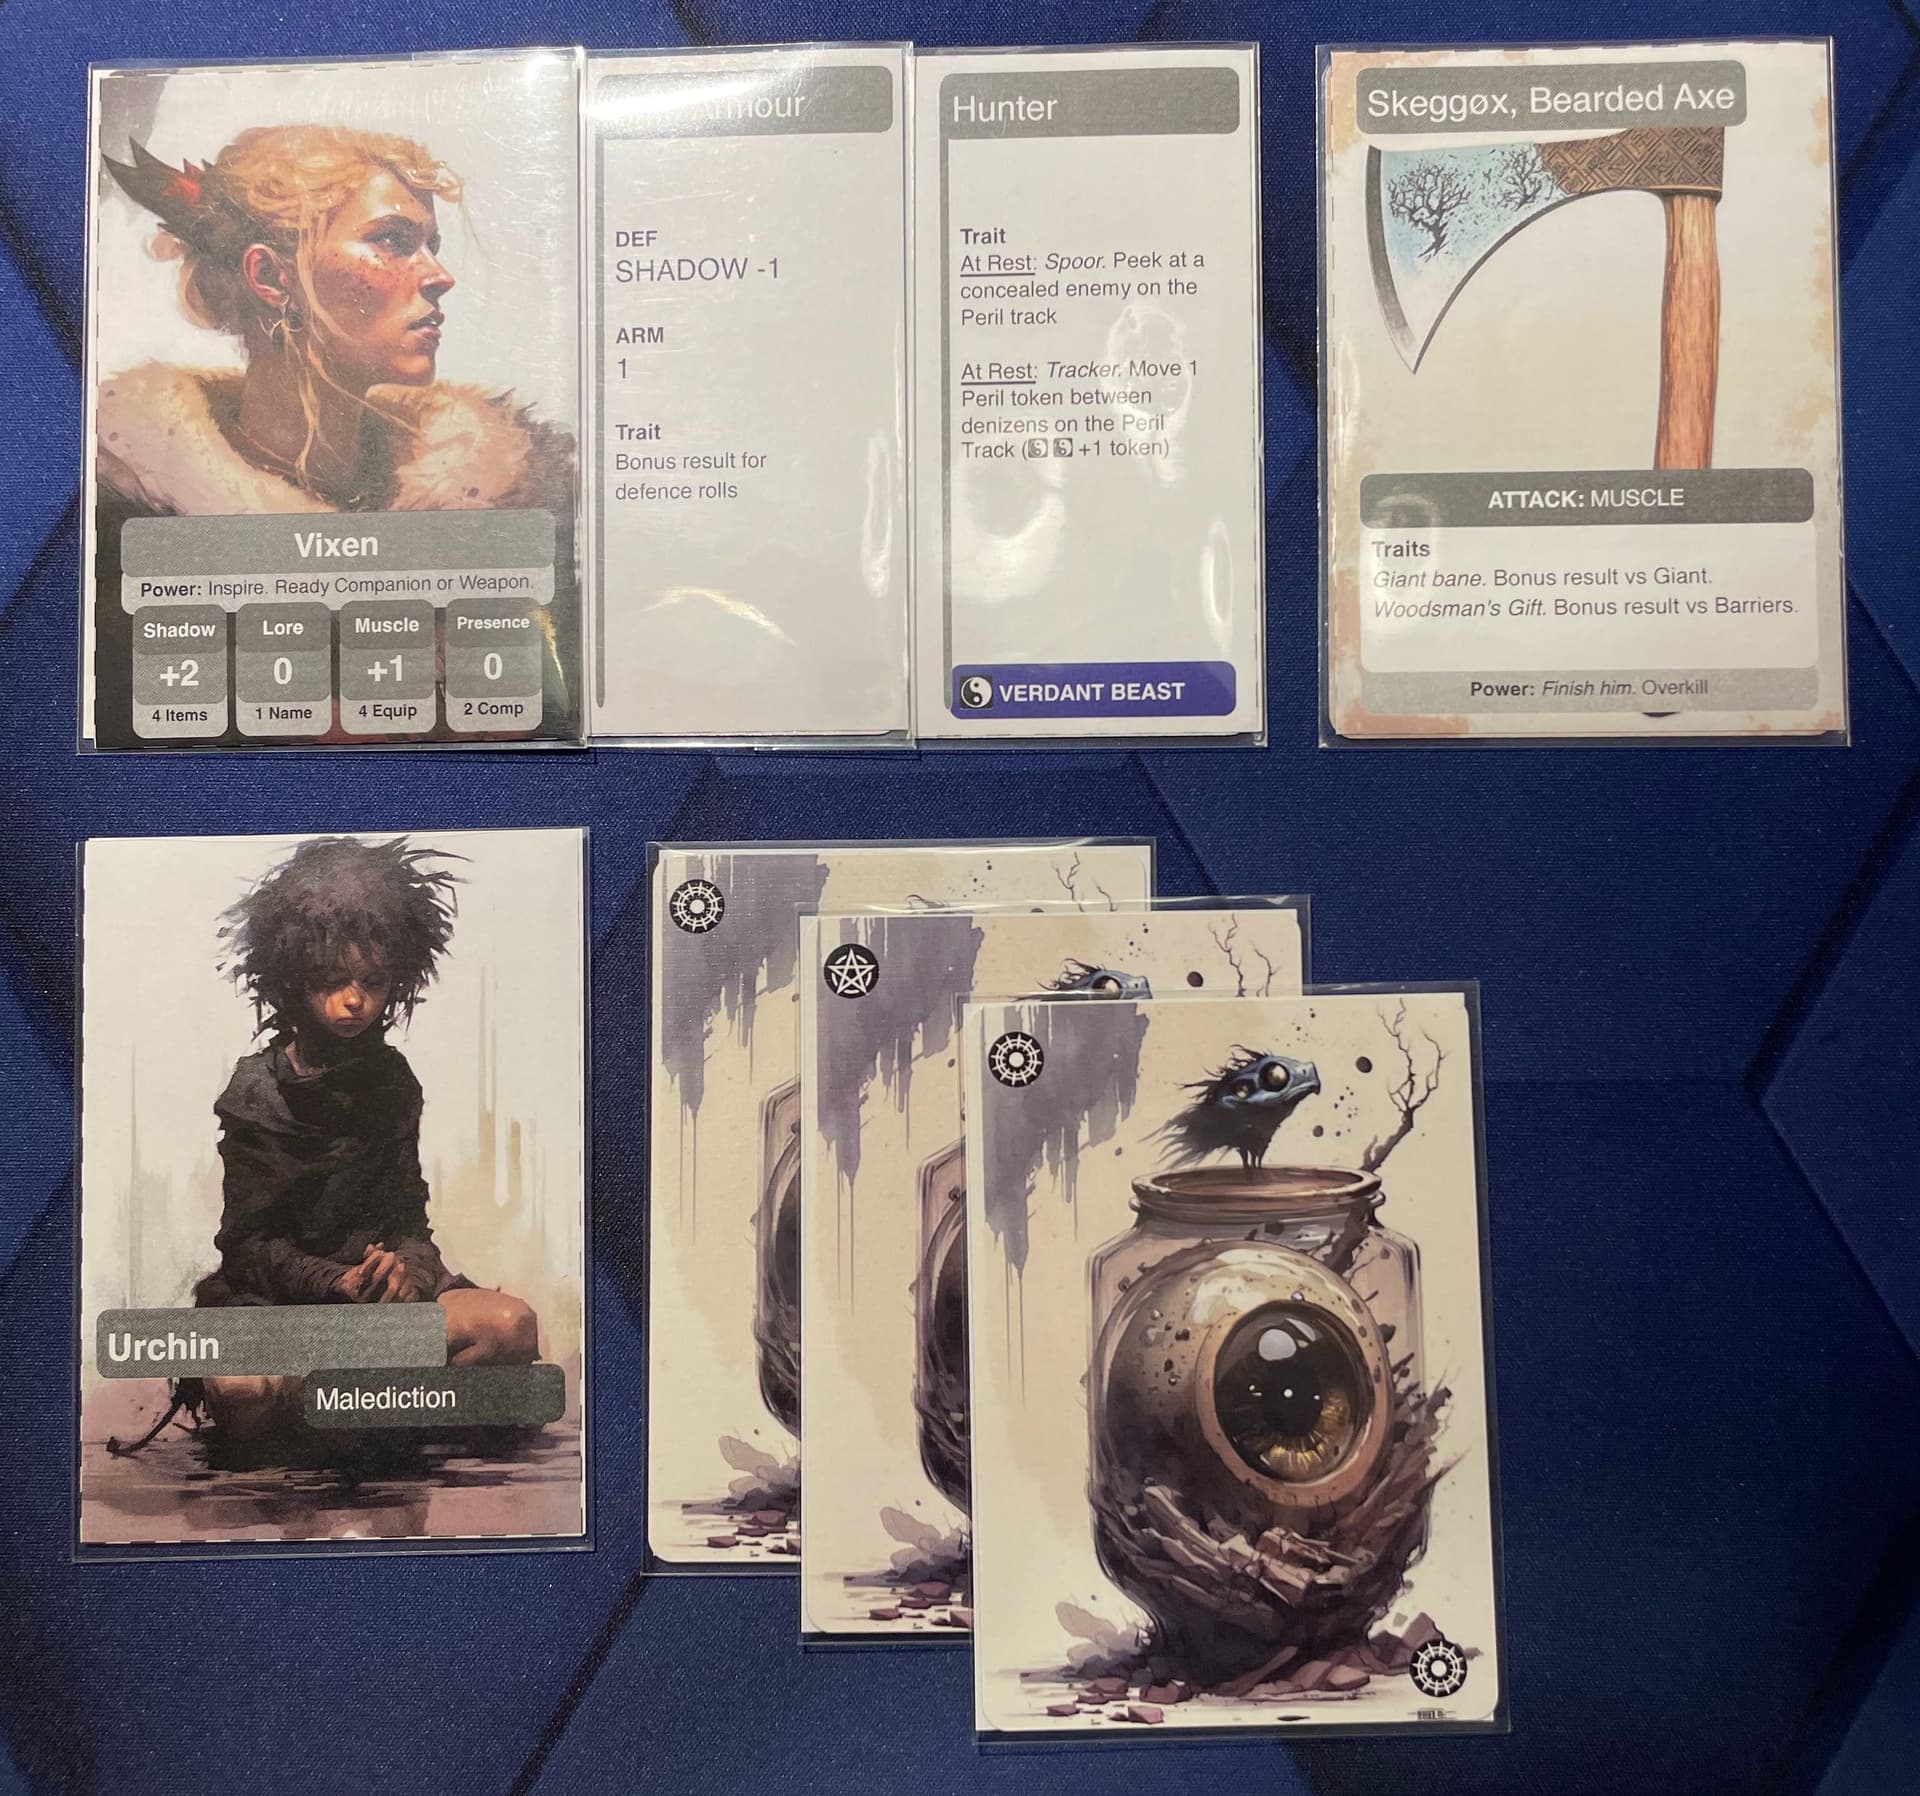
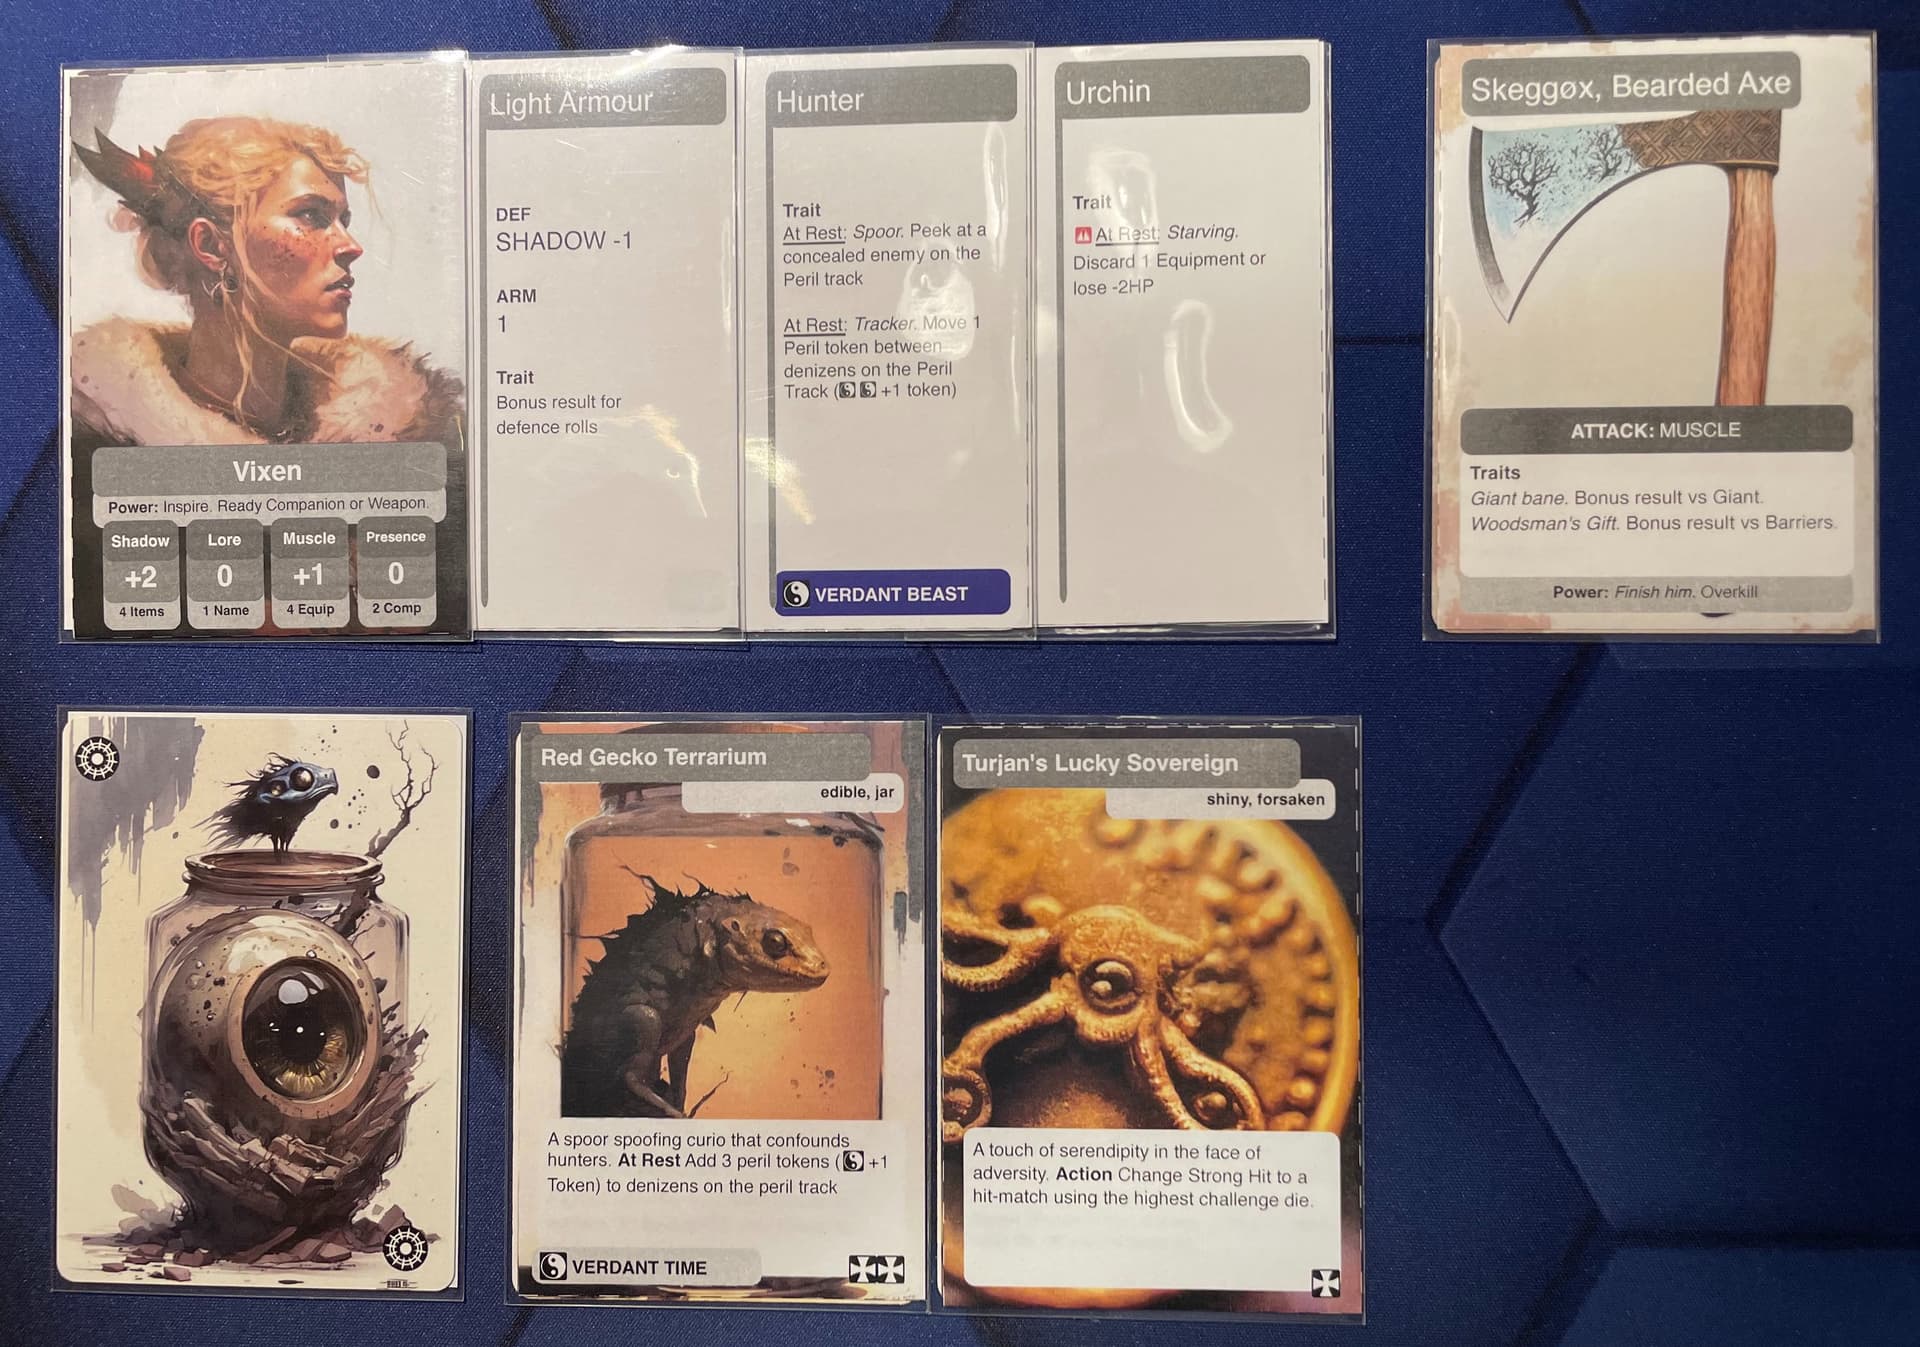
Maledictions are like any Hero Accoutrement and are attached to the Hero card. Unfortunately, Maledictions will often make your life harder as a Hero. In this instance, the Urchin will cost the Hero 2HP or an equipment card every time they rest. More on this later.
The Loot cards present your first real decision of the Quest. Loot cards are drawn face down. You can choose to leave the Loot face down or to reveal the card turning it face up. However, once revealed you must accept the item revealed.
Face down loot cards represent generic adventuring equipment like rope, a torch, iron spike and so on; a kind of abstract supply resource that can be used in various ways throughout the game.
Face up Loot cards (or Loot Items) are very specific and often quirky things that affect the game in a myriad of different ways. Items can be very useful, but once revealed cannot be converted back to Equipment.
It’s not a bad idea to have a mixture of Equipment and Items in your inventory as it gives you more options.
Vixen decides to rummage in her rucksack and reveal two items; a red gecko and a lucky coin.
Threat Deck
Next we read the Threat deck and discover the nature of the various dangers in the Ziggurat for this Quest.

The Tutorial nominates some specific rule changes to simplify your first play through:
- reducing Scouting to a single tile each Movement Phase – ie. reducing your exploration choices
- reducing the number of different denizens you might encounter – ie. swapping any reference to Ziggurat faction for the Jungle faction
- removing experience from the game – ie. ignore Memories and Mastery rules
Vixen will remind you about these rules throughout the walkthrough.
Loot Level
The Loot Level determines how much loot each enemy you face will be carrying and is an indication of how dangerous the Ziggurat is. A Loot level of 2 is the lowest. Different factions can have different Loot Levels depending on your quest. For the Tutorial everybody has the same.
Threat Escalation
During the course of your adventure Peril tokens will accumulate here on the Threat card. If the number of tokens exceeds the Threat Escalation value at the end of your turn, you will perform the Action listed. During the Tutorial, if you tarry too long (collect 3+ Peril) then you start the feel the effects of your impending doom.
Peril Deck
Take the 6 Standard Peril cards and shuffle them into a deck, placing them next to the Threat Deck.
Note, in longer quests the Peril deck comprises of 6 Standard cards and 9 Peril cards specific to the Quest.
And with that we are ready to start.
First Turn
The initial set up of quests can be quite varied. However, they all start exactly the same way.
- determine your start tile and place your avatar there
- place a barrier token on an unconnected doorway to show where you arrived from
- the start tile is considered to be fully explored
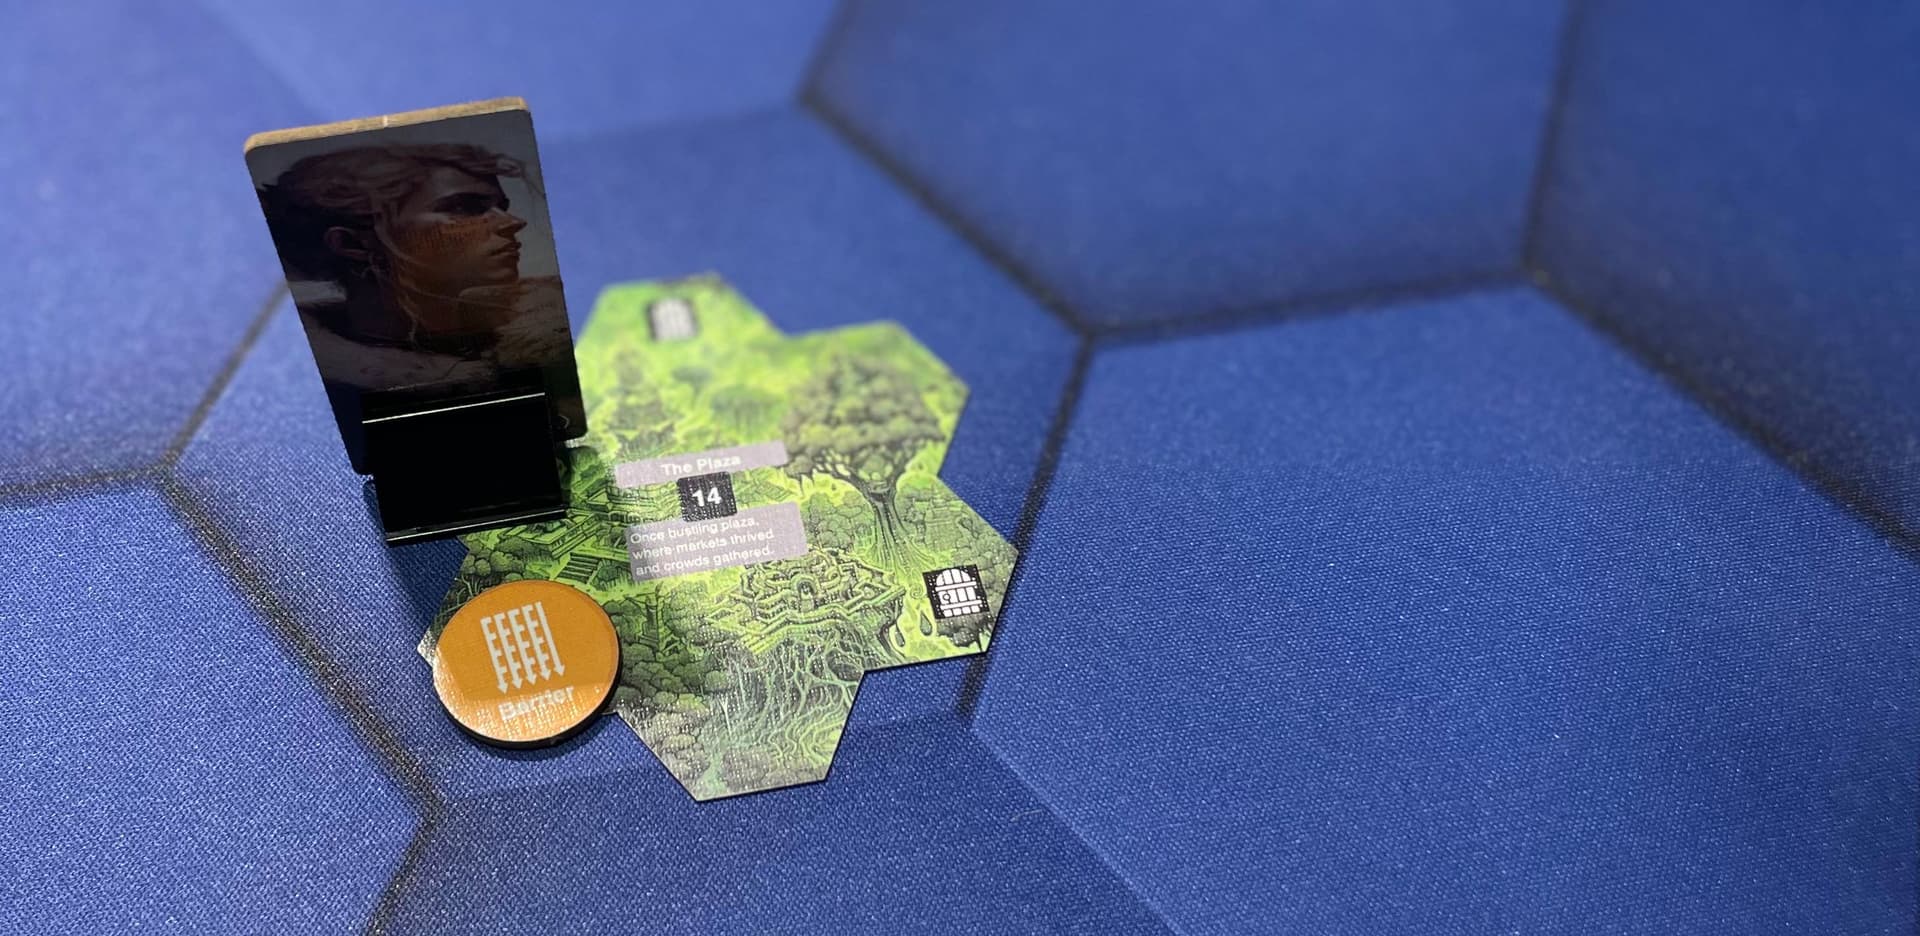
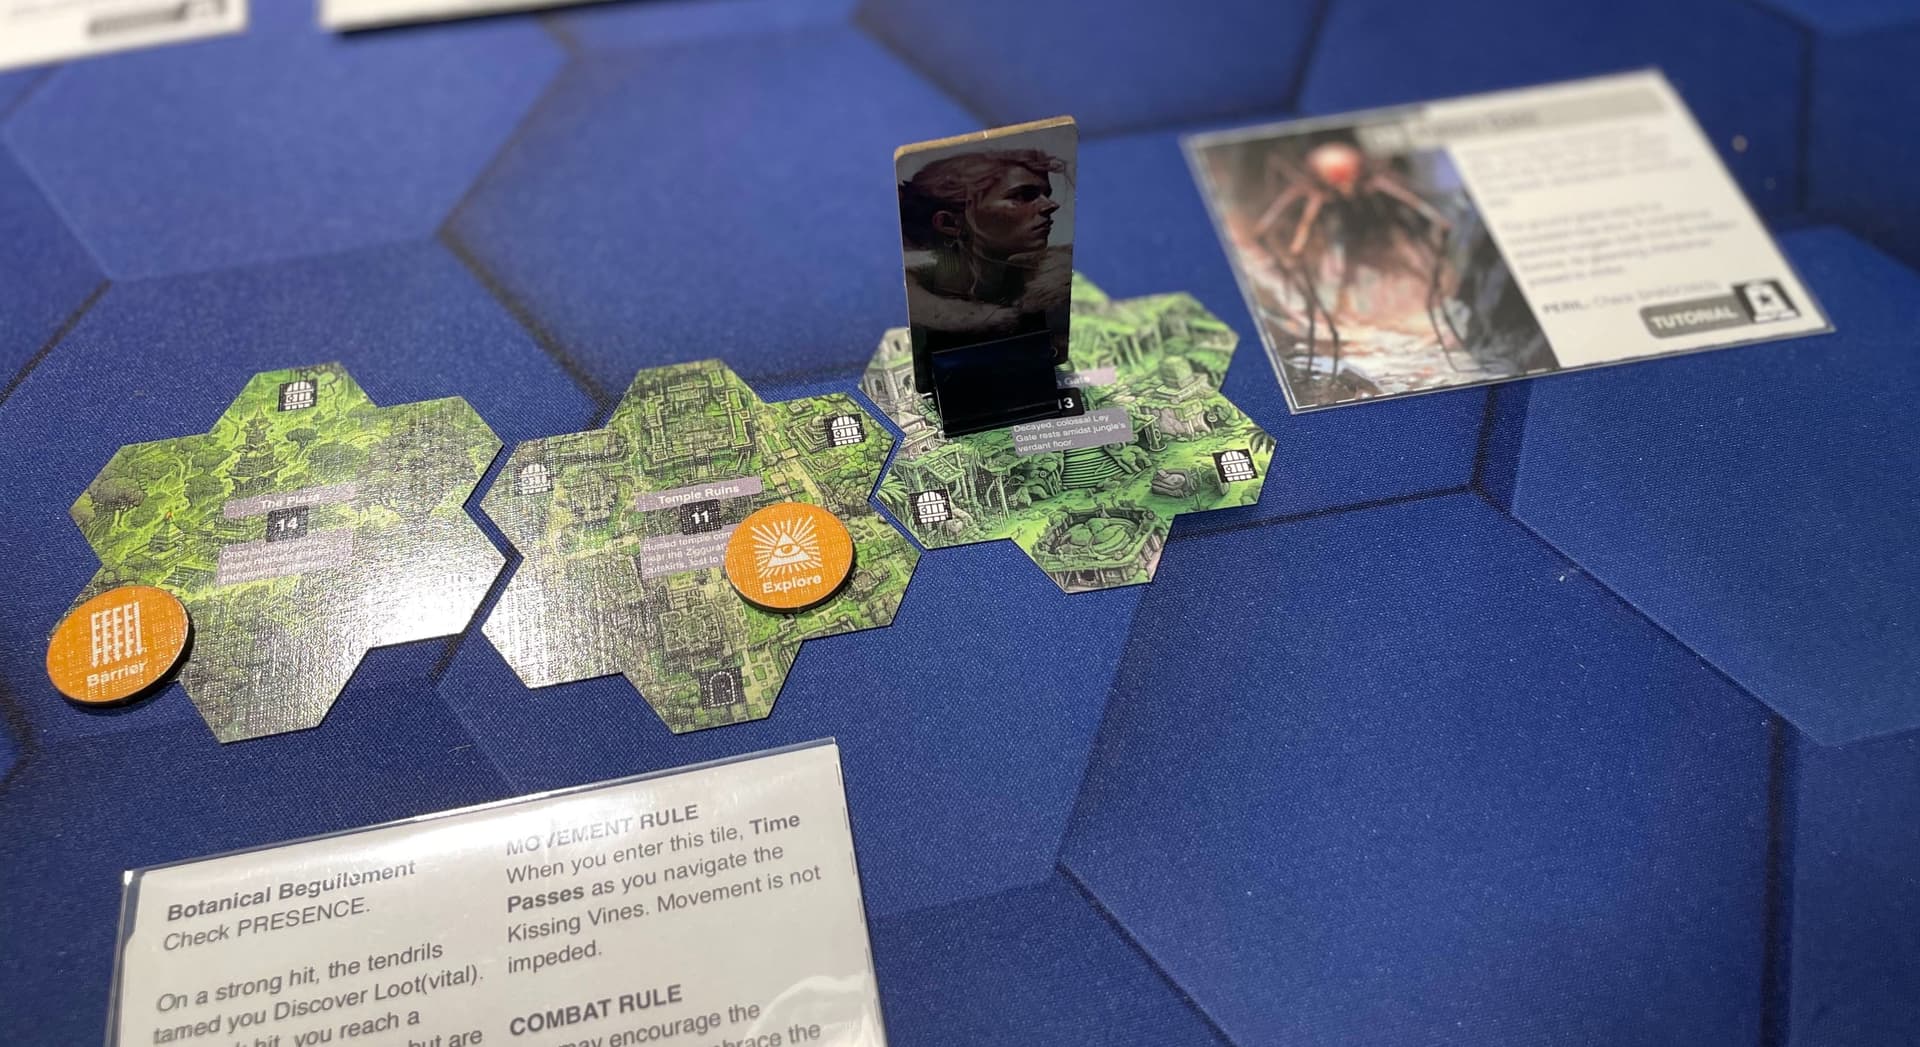
Vixen hacks her way through the jungle and emerges into the ruins of a great plaza;
Placing a BARRIER token on an unconnected door
Game Loop
Then you kick off the game loop, and cycle through the phases of a turn until your quest is complete:
- Move
- Explore
- Rest
- Peril
Turn 1
Movement Phase

Vixen Scouts drawing a single tile from the top of the Map Stack. Ordinarily she would have drawn two tiles as there are two unconnected doors, however, the Threat deck Movement Rule restricts us to a single tile.
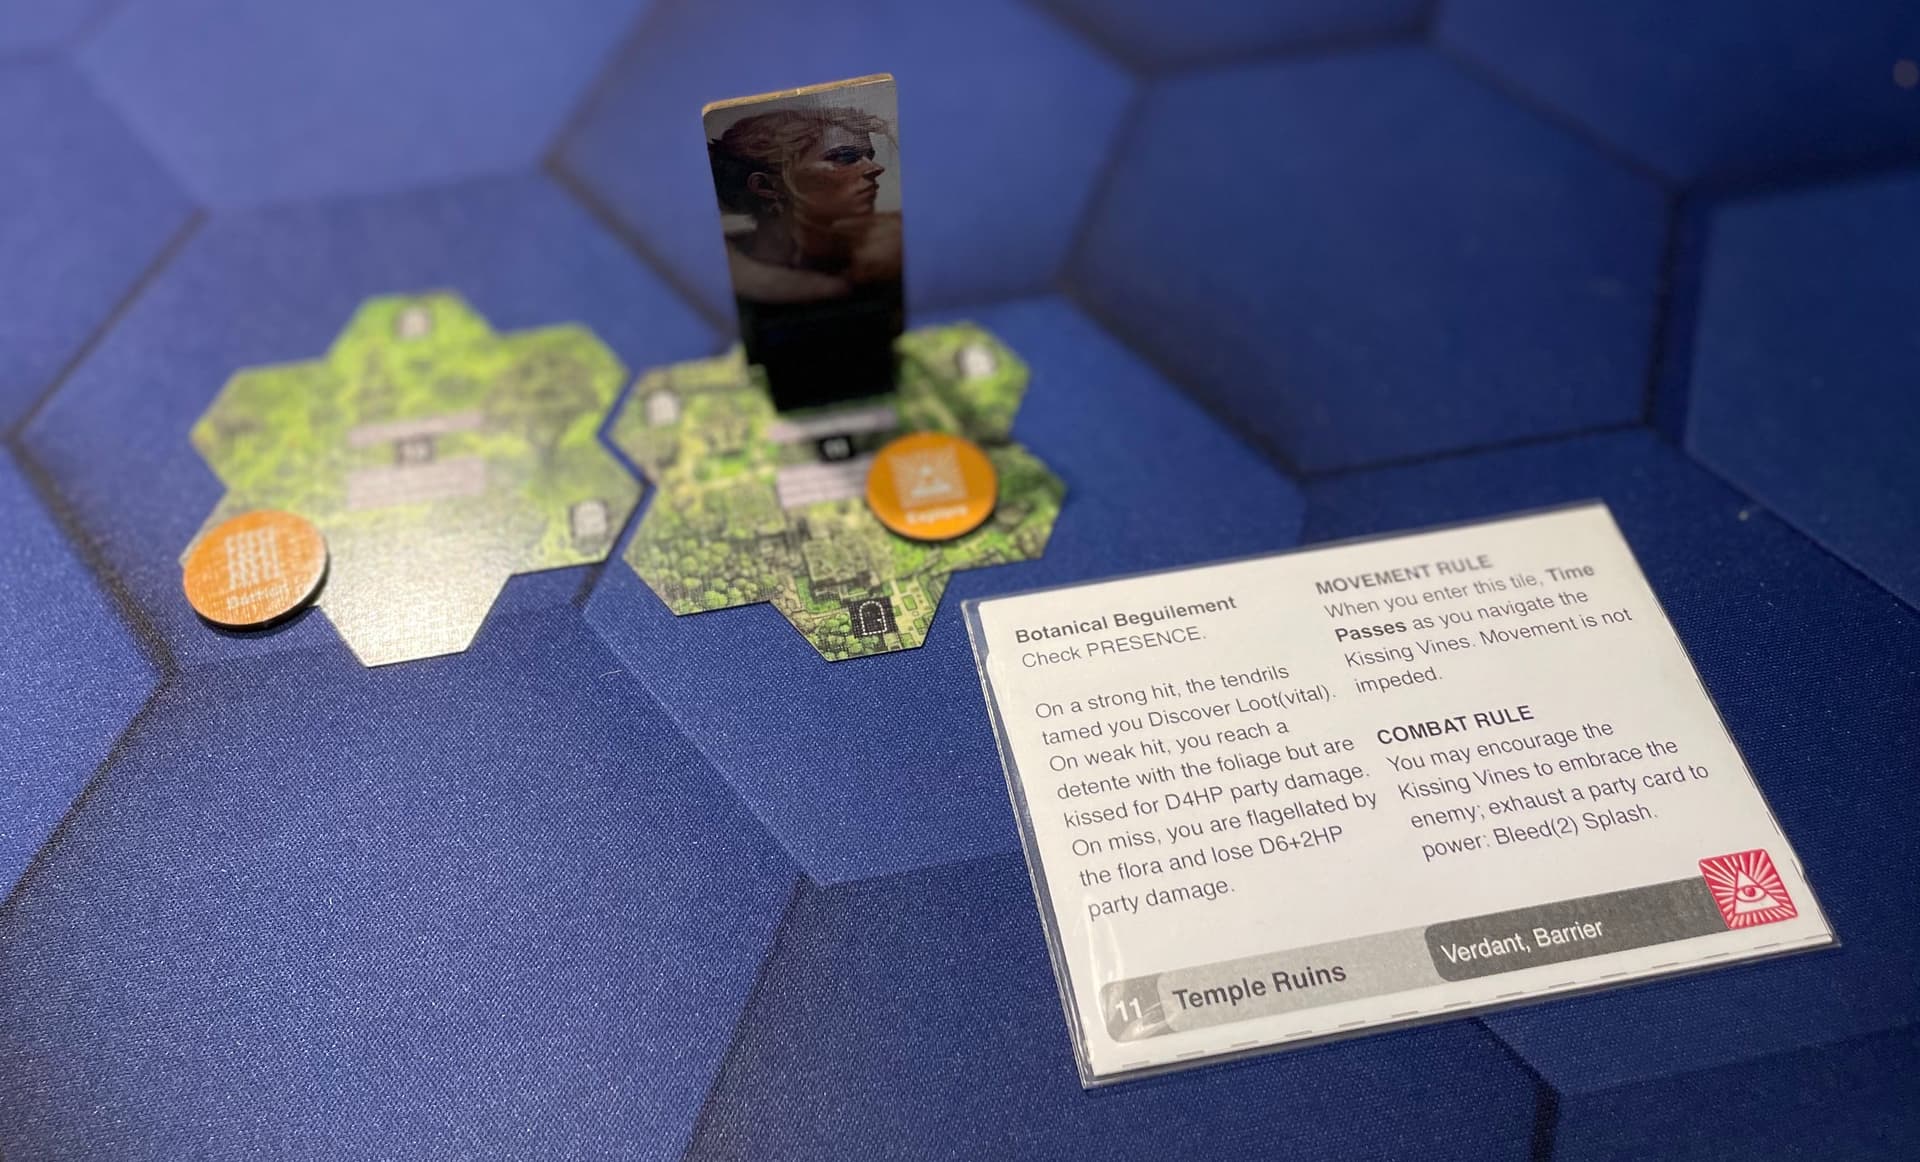
Vixen places Map 11: Temple Ruins connecting unconnected doorways with at least 2-sides of the tile.
Vixen can’t move onto an unexplored tile, and there are no other tiles available so Vixen stays put with a Movement 0.
Explore Phase
Vixen is adjacent to an unexplored tile, so she decides to explore that area, moving her avatar to that location and collecting the benefit on the reverse of the Explore token – ???
Whenever we explore a new location, we check to see if the next Quest Location has been revealed. The Quest Deck shows that we’re looking for 33: Throne Room. We can’t progress the quest, and so Vixen draws a new Location Encounter from the encounter deck that matches the number on the explored tile ie. 11: Temple Ruins.
For the Tutorial this is an encounter with the Kissing Vines – Vixen reads the intro and then turns over the encounter card.
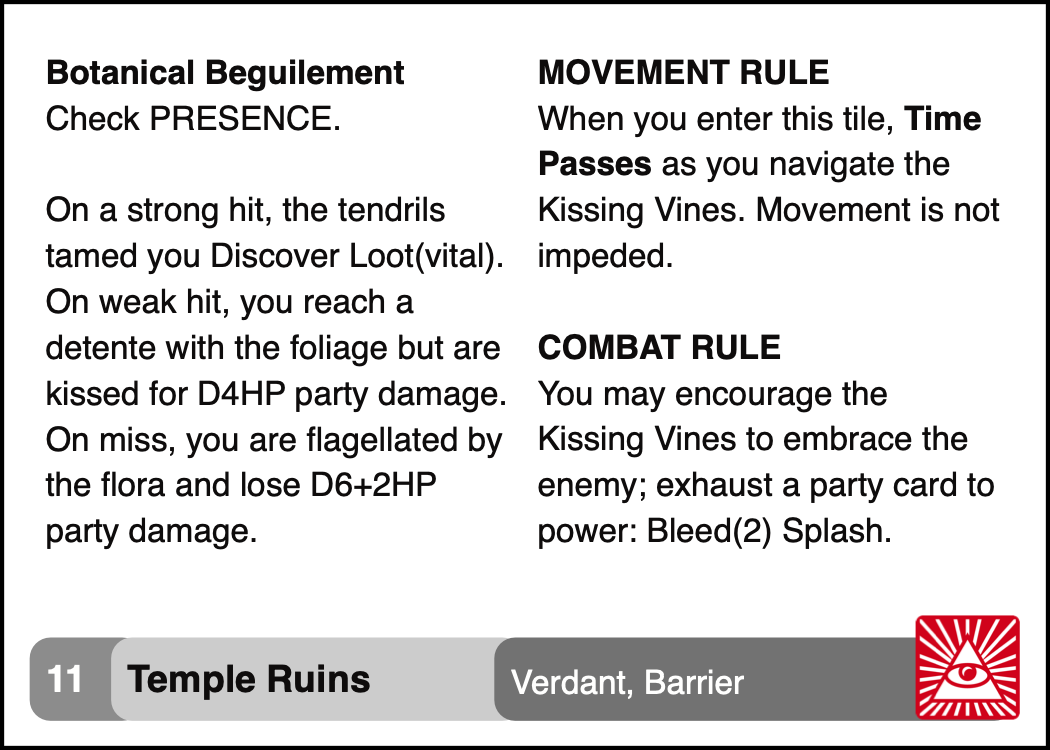
Check PRESENCE – Vixen is required to perform a simple Skill Check, and so rolls the target and challenge dice. Vixen has a PRESENCE of 0 so no modifier. Rolls T4+5/6 – a miss. She then rolls 3 on D6 and is flagellated for 5HP of damage (3+2).. yikes that hurt.
The location has the Place of Interest (POI) icon and so will remain on the map until we’re instructed to remove it. Vixen places a POI token on the map tile as a reminder and leaves the encounter card face up on the table adjacent to the map tile.
A couple of things to note about this POI. The MOVEMENT RULE requires that whenever we choose to move through this location in the future, we will have to perform the Time Passes action. Also, the COMBAT RULE indicates that we can use the Kissing Vines to harass our opponents if we were to enter combat at this location. For example, you might choose to ambush some opponents here to gain an advantage.
Rest Phase
Vixen has the option to Press On or Catch Your Breath.
Given that the only useful thing we can do in the Rest Phase at this time is Heal, Vixen decides to shrug off her injuries and Press On.
Stopping to Catch Your Breath always involves a Time Passes action. How important it is to reduce the passage of Time will vary greatly depending on the nature of the Quest. In the Tutorial, if our Hero tarries too long they will attract the unwanted attentions of the local fauna.
Peril Phase
Vixen checks the Peril track for anything to activate. So far in the quest we have no Environment Cards and no Enemies in Pursuit so there is nothing to do here this turn.
You should make space adjacent to your Peril Deck for the inevitable arrival of cards to the Peril track. These will represent changes in your environment and enemies in hot pursuit of your Hero.
Next Vixen resolves a Peril encounter. As we have no enemies who may have caught up with us (Overrun) we draw a Peril card and resolve the encounter.
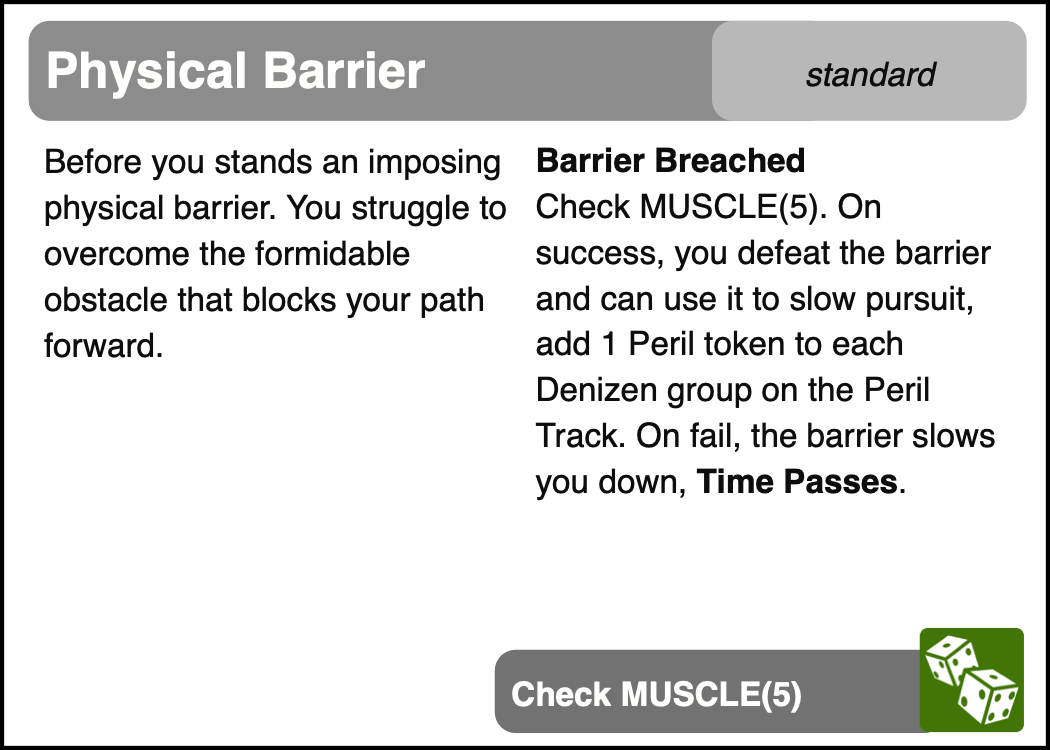
Another skill check, this time Check MUSCLE(5). The number in parenthesis indicates this is a “Skill check with progress”. We keep rolling skill checks until our accumulated result exceeds 5 or we fail a check.
Vixen is tough and has a +1 MOD for Muscle. She rolls T4+3/4; a result of 3. Rolls again, T5+7/2 for a result of 2, and having accumulated 5 (3+2) passes the test. There is no one in pursuit, but at least we don’t allow additional time to pass. We place the card in the Peril discard.
Vixen then Checks the Threat Level. There are not 3+ Peril tokens here so nothing to do.
And last Party Clean-Up. Vixen has no conditions (poison or shaken) and has not exceeded any of her inventory limits as shown on the Hero card. Lastly, Vixen would need to process all Memories into Mastery but as per the Threat Card we are ignoring all experience related actions during the tutorial. We don’t have any location encounters or denizens to discard at this time in any event.
Note, the Hero limits for party inventory are clearly shown beneath the stats on the Hero avatar card. Limits only apply at the end of the turn. During a turn you can carry and command as large a party tableau as you like.
Turn 2
Movement Phase
Vixen Scouts and places Map 13: Fallen Gate with a Movement 0.
Explore Phase
Vixen explores the Fallen Gate, moves onto the tile and collects the Explore token benefit.
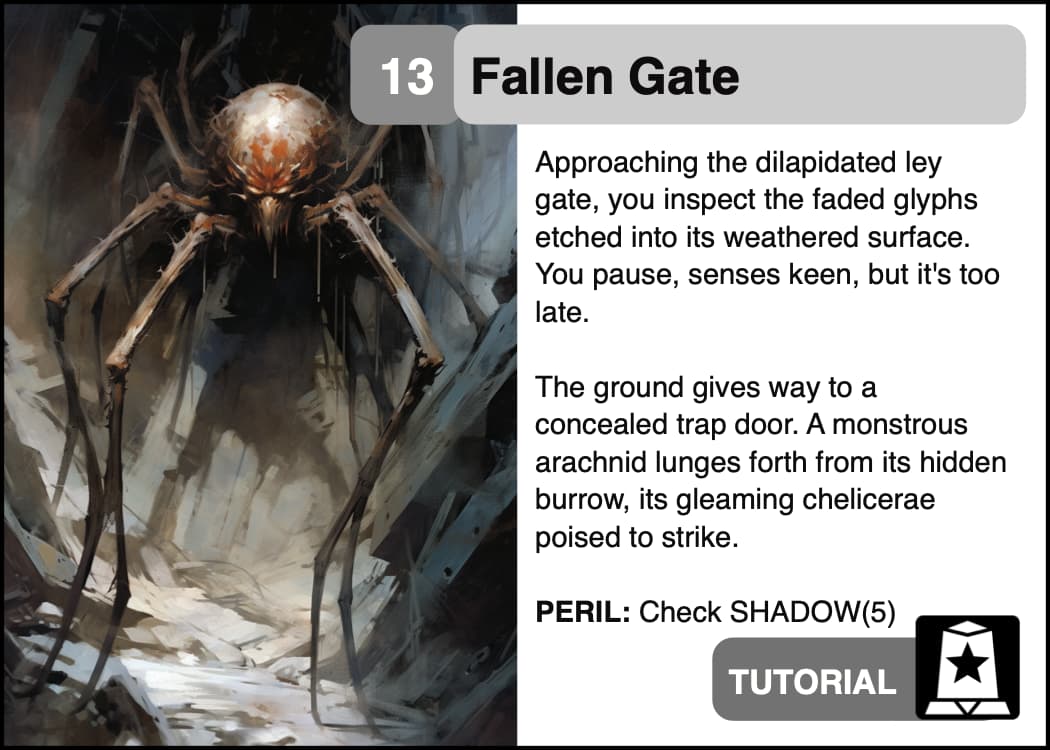
Vixen draws a matching location encounter, and after reading the intro is confronted with a PERIL decision; PERIL: Check SHADOW(5)
A PERIL decision must be resolved prior to turning over the encounter and may involve a skill check (like this one) or a choice the player must make before proceeding.
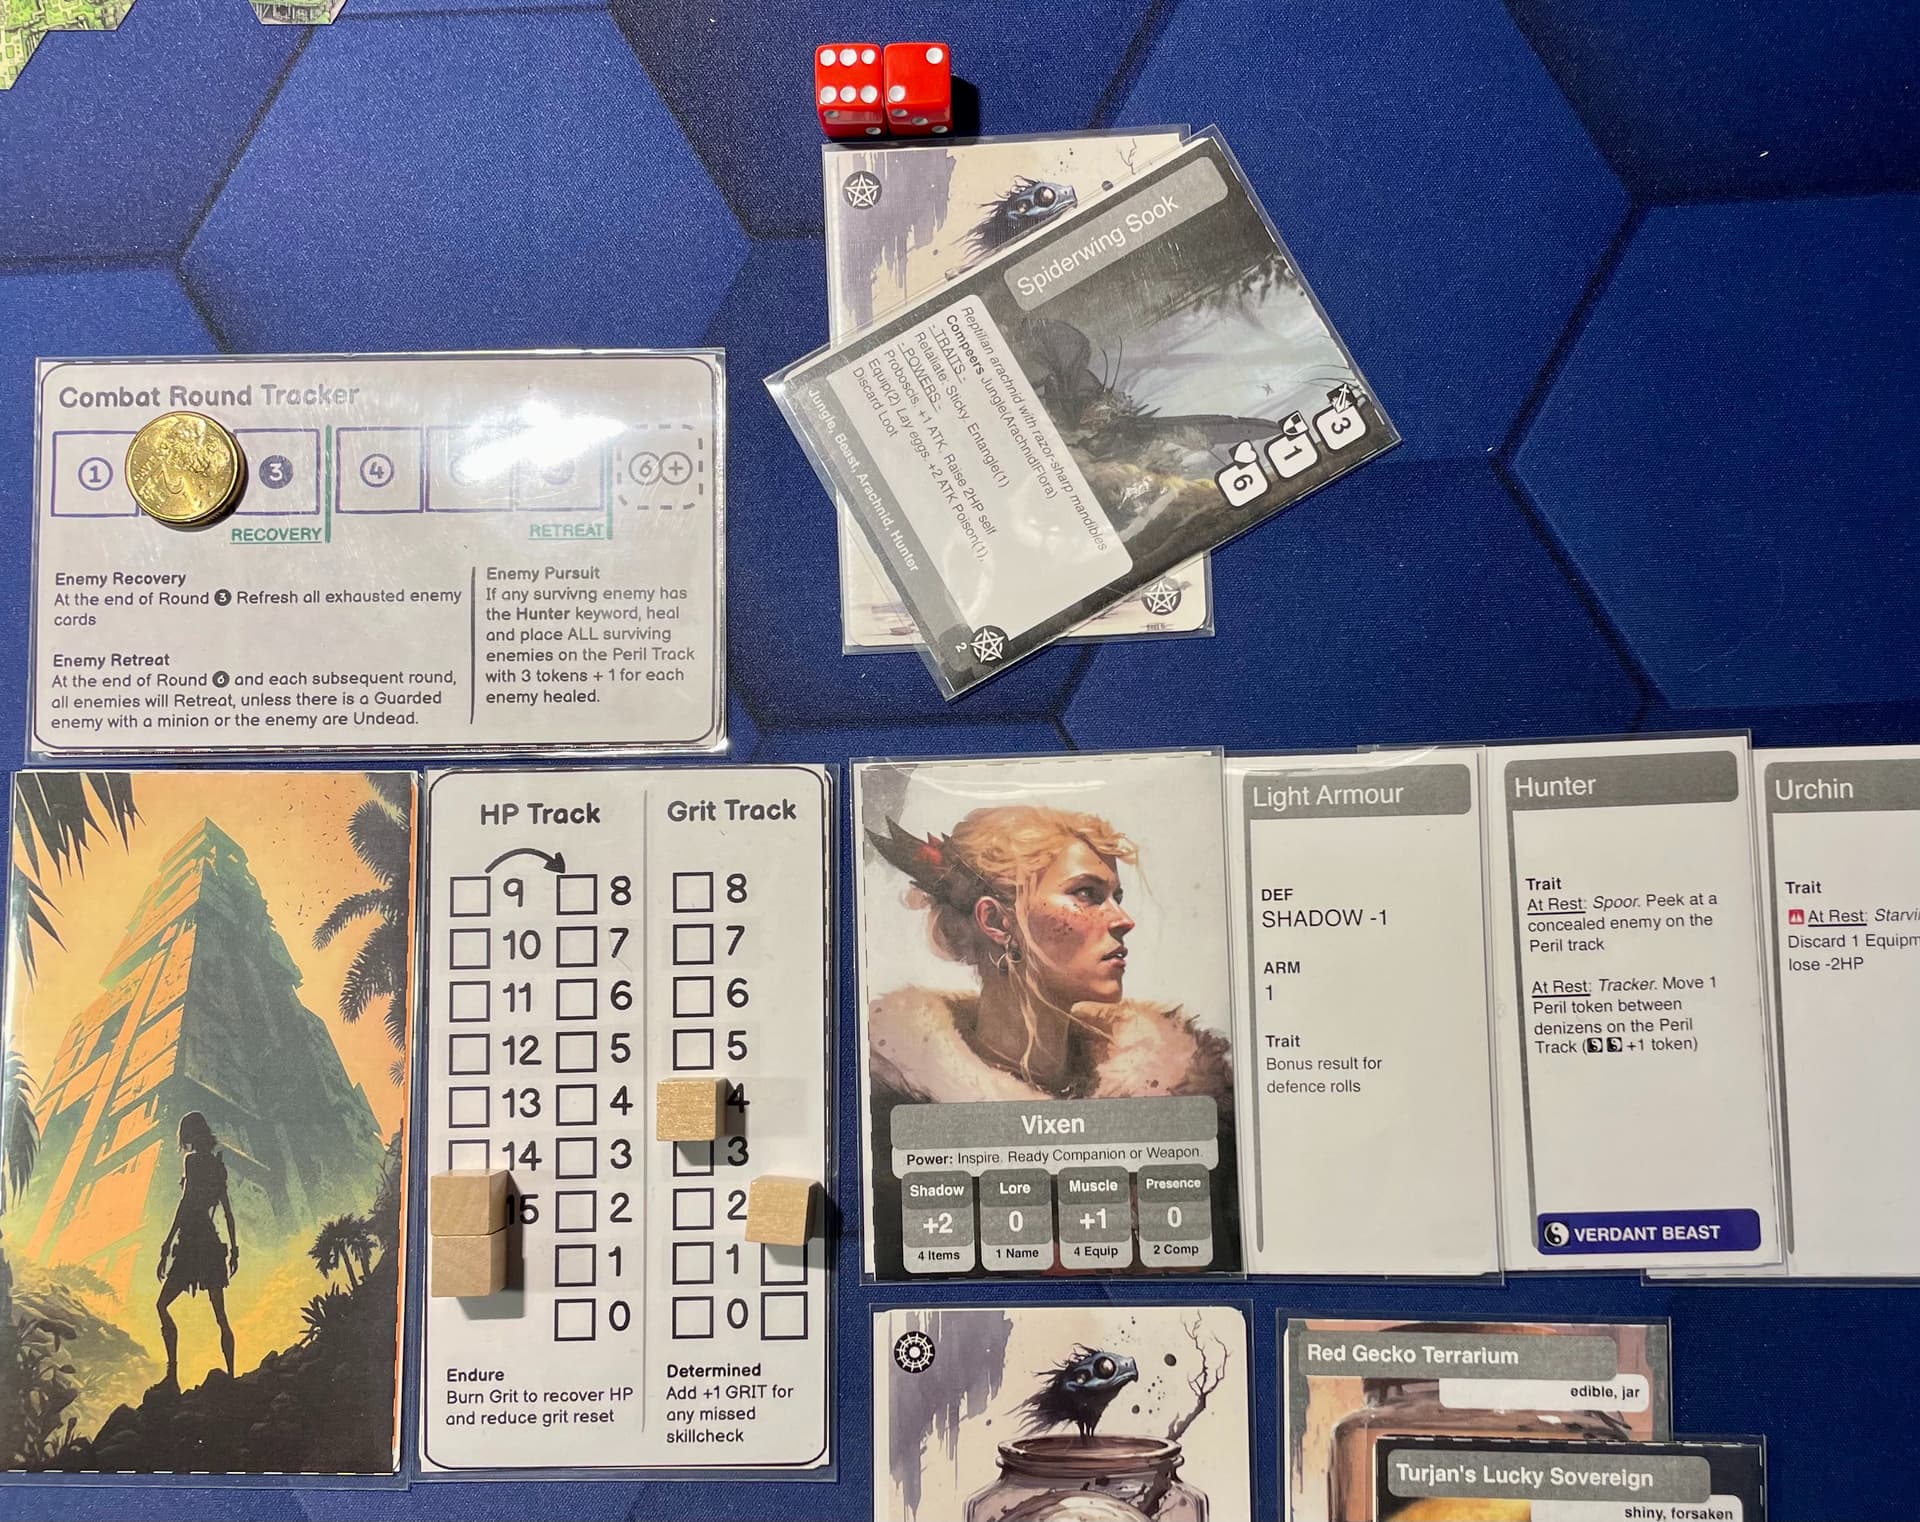
Vixen has a +2 MOD for SHADOW but is unlucky and rolls T4+5/7; a miss. She immediately adds +1 to her Grit Track (Total 3), and turns over the encounter.
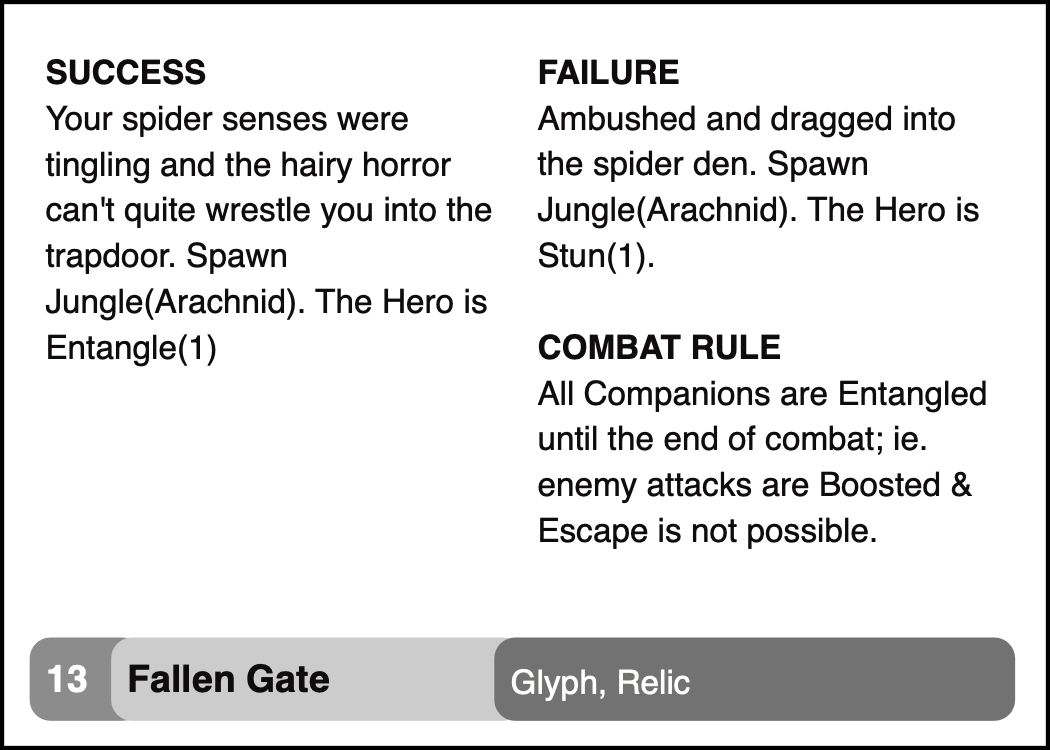
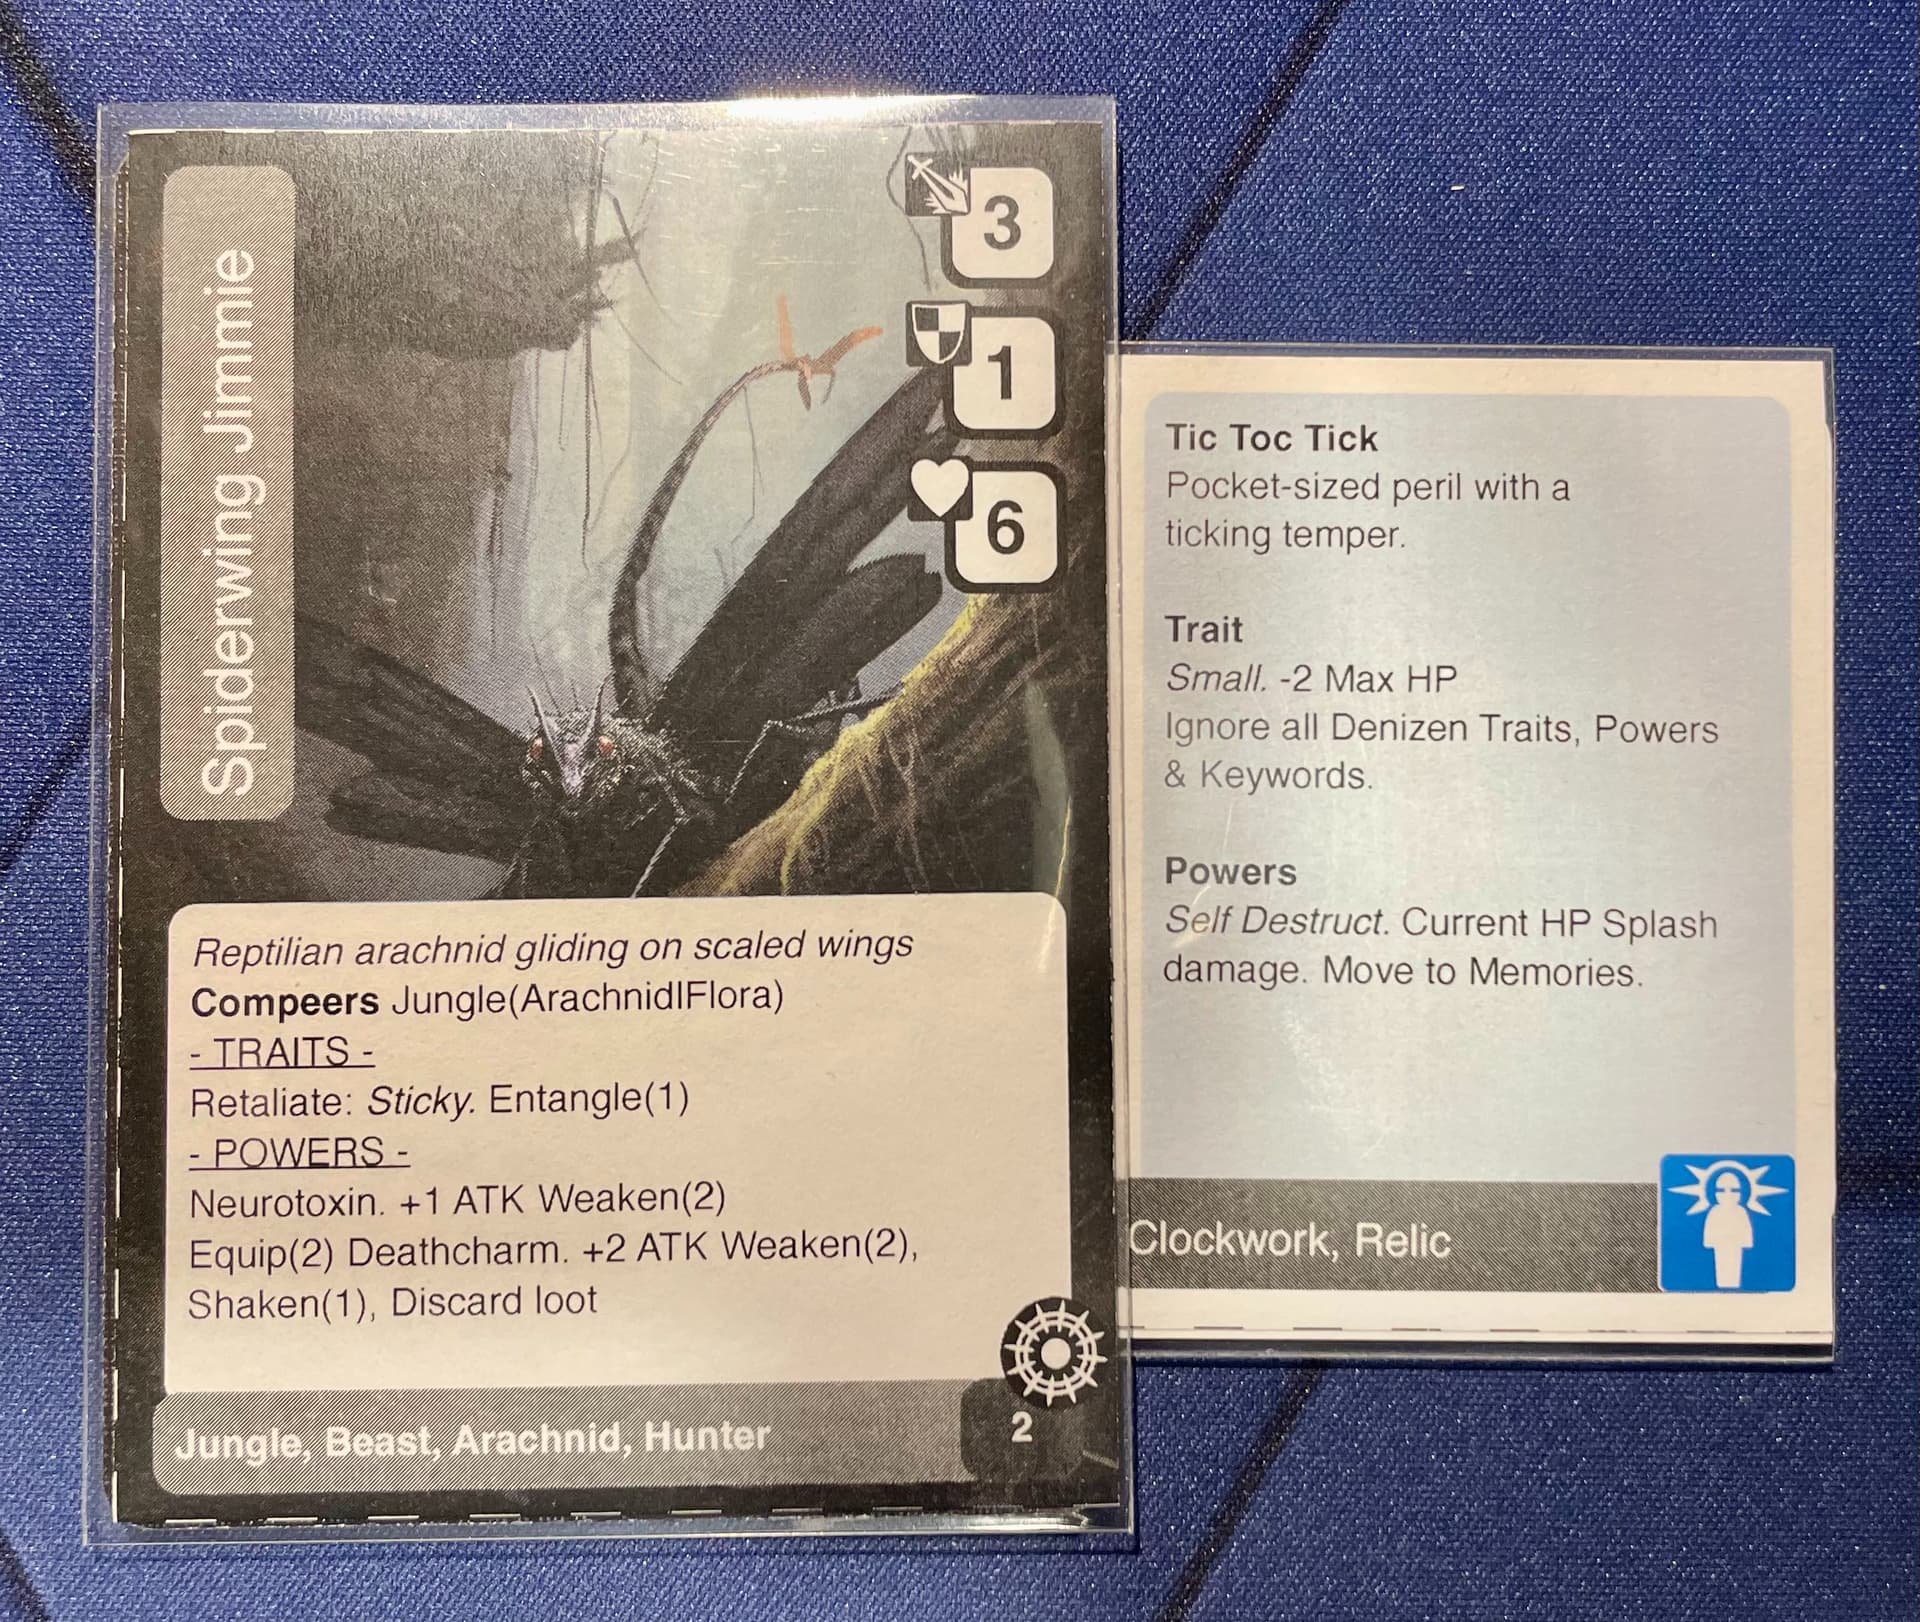
Vixen checks the top of the Jungle faction deck, progressing cards to the back of the deck until she finds a matching Arachnid keyword.
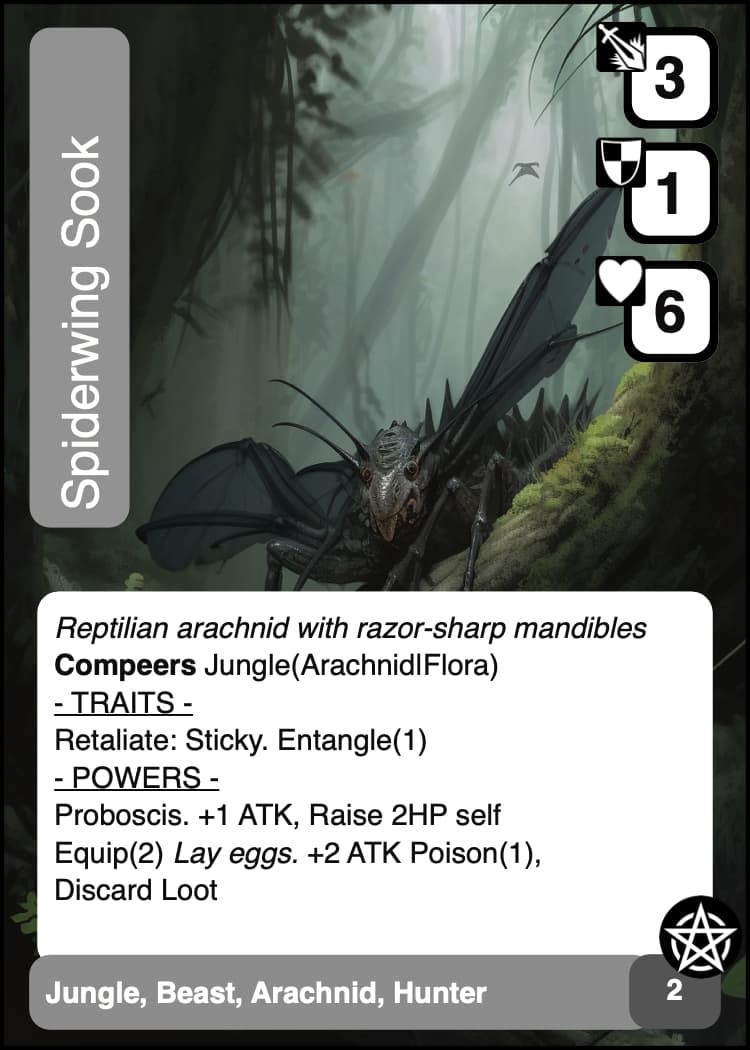
The Spiderwing has no option for Parley and so we must equip the denizen prior to entering the fray. Draw a number of loot cards equal to the current Loot Level for this faction. The Threat Deck indicates that all denizens are Loot Level 1, so we draw a single Loot Card and compare the icon on the back to the Loot Icon at the bottom right hand corner of the denizen; a pentagram.
The Loot matches so we tuck it face down under the enemy card; it is Equip(1). Place the combat round tracker at round one, and apply a Stun(1) token to the hero.
Round 1
Vixen starts the first attack phase stunned, so she has the choice of making a Fighting Retreat or missing her attack (and gaining +1 Grit). She’s upset with the situation and decides to stick around, gaining +1 Grit (Total 4). The Stun token “cools down” and is removed.For Vixen’s Defence phase, she rolls her defence check with a +1 MOD (Light Armour is SHADOW -1); T5+2/4, a strong hit. As there is only a single enemy she assigns both challenge dice to defend against the Spiderwing attack for 6.
The Spiderwing is in the ready state, so it will activate its highest Power. It only has a single loot card ie. Equip(1) and so we activate its Proboscis attack for 4HP (Base 3 ATK +1ATK). This is not enough to overcome Vixen’s defence of 6 so no damage is dealt. However, any additional effects apply and in this instance the Spiderwing will Raise 2HP self; increasing its HP temporarily to 8HP. We exhaust the Spiderwing card.
Remember Vixen could use one Loot Item per combat round if she chooses, but only has a Red Gecko and a Lucky Coin neither of which are particular useful at the moment.
Round 2
The Spiderwing is exhausted but now has 8HP.Vixen attacks with her Axe (+1 MOD from MUSCLE) T7+5/4. A result of 5HP damage, minus 1 from the Spiderwing’s armour; the enemy suffers 4HP and is reduced to 4HP (8-4). The Spiderwing activates Retaliate; we get stuck and gain Entangle(1).
For Vixen’s Defence we roll T4+6/7; a miss. Vixen gain’s 1 Grit (Total 5).
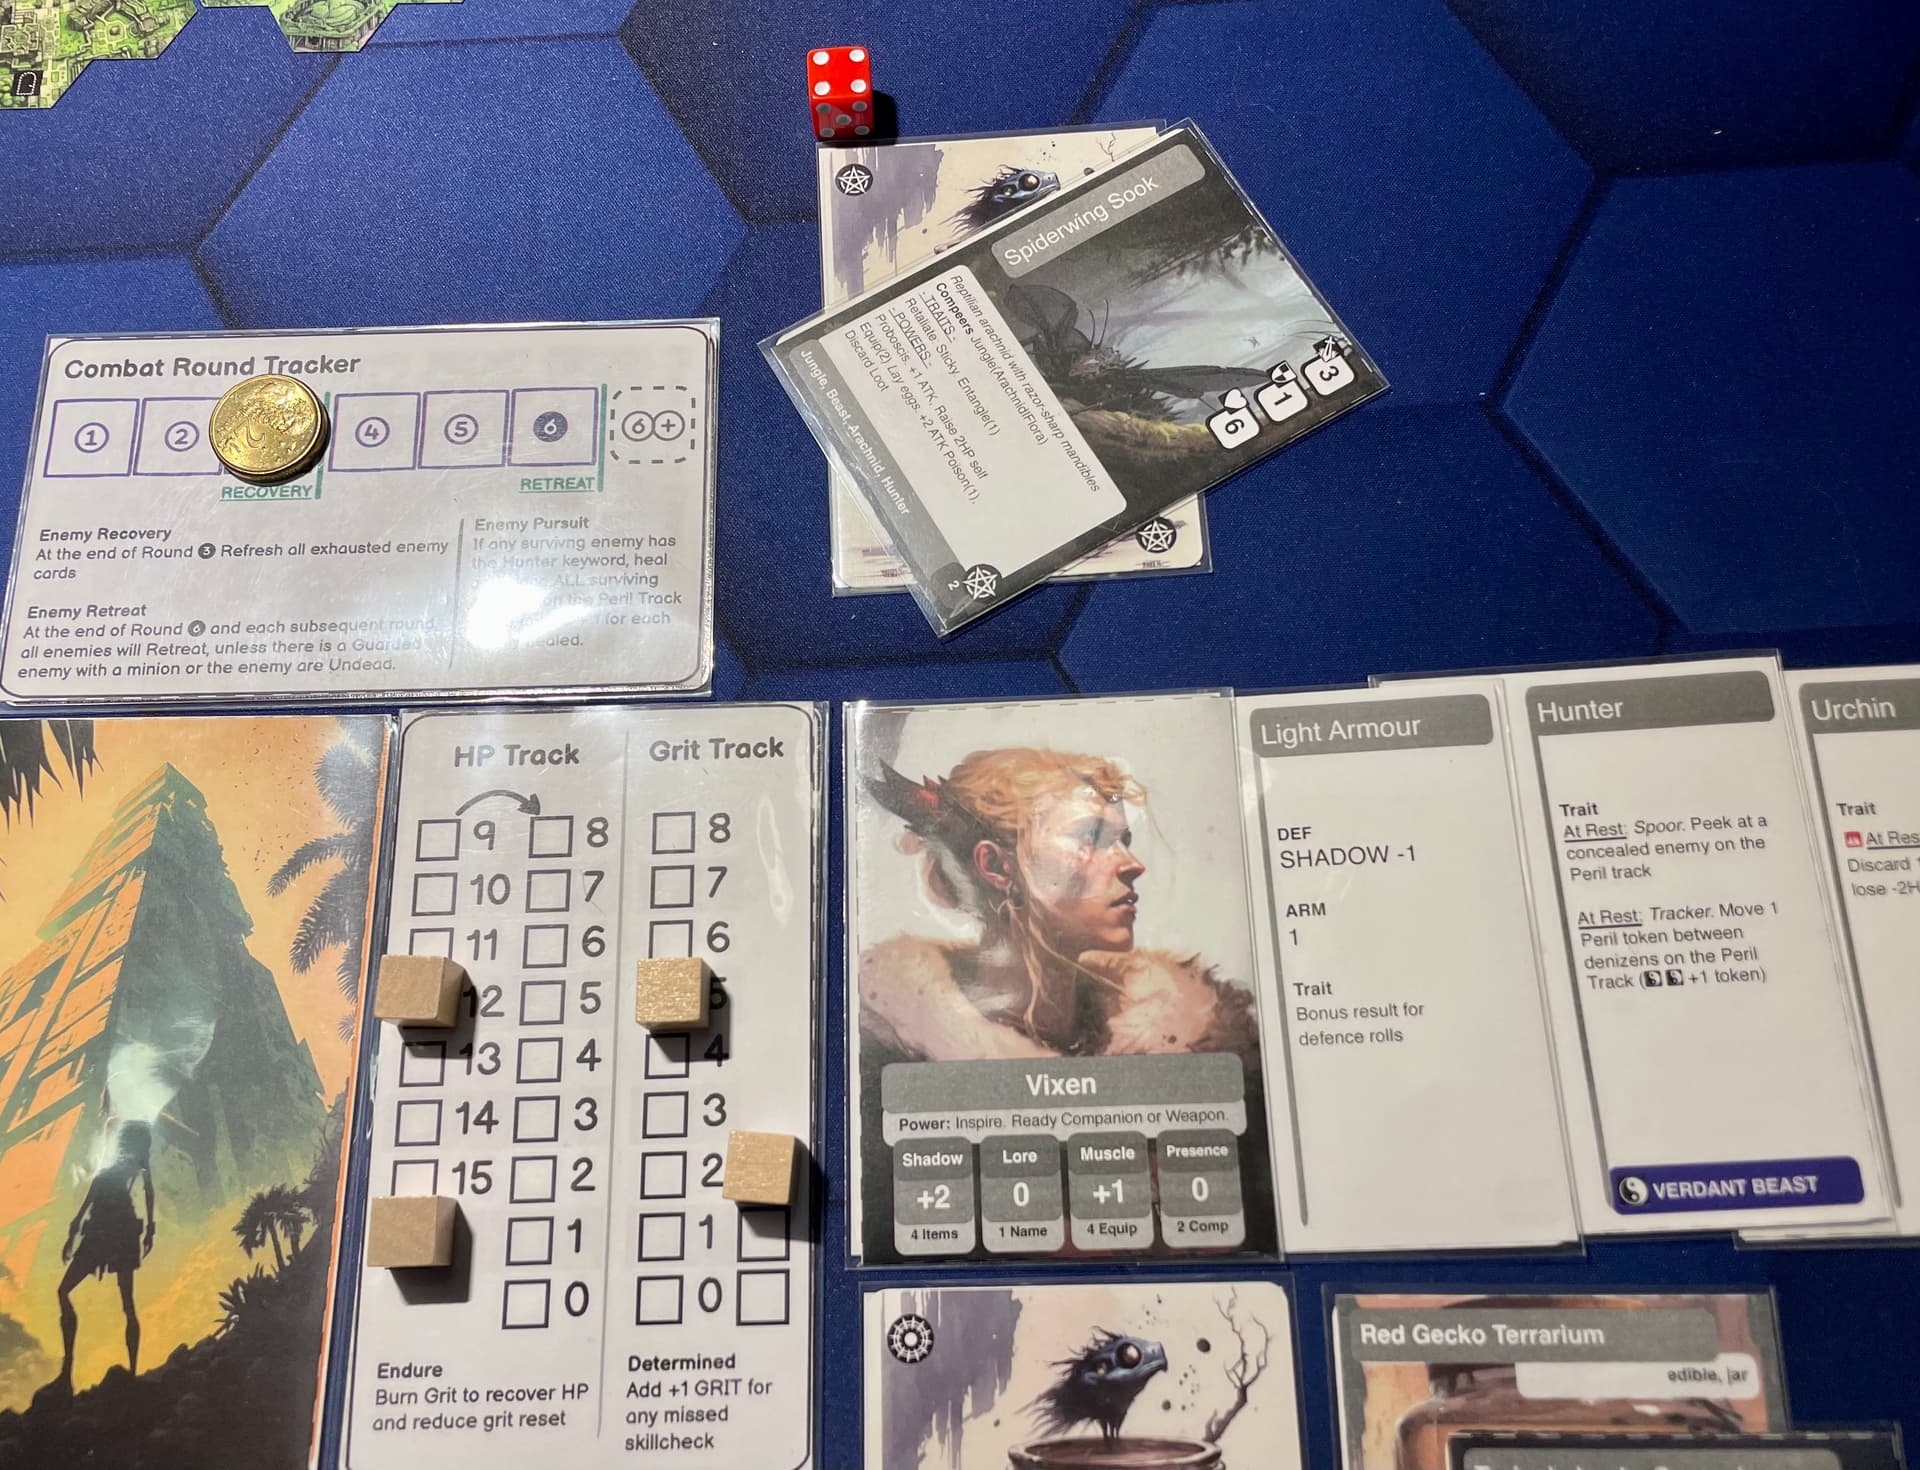
The Spiderwing is exhausted so only does a basic attack for 3HP. However, because Vixen is Entangled(1) it gains a Boosted attack, and draws a loot card checking the bottom right hand corner; 1 bonus damage. Vixen is dealt 4HP damage, less one for her light armour and is reduced to 12HP (15-3).
The Entangle status cools down and is removed.
Round 3
The Spiderwing is exhausted and has 4HP.Vixen attacks with her Axe (+1 MOD from MUSCLE) T2+2/2; a miss-match. This is not great. Vixen’s Grit track is at 5 so she decides to burn Grit, changing the target to a 5 for a T5+2/2; a hit-match. Then reduces her Grit to the Grit reset level of 2.
The hit-match automatically scores a bonus result (both challenge dice score for the result) and so deals 4HP (2+2) damage. Less the 1 armour the Spiderwing is reduced to 1HP (4-3). And Vixen gains an additional benefit of +2 Grit (Total 4). Again, the Spiderwing activates Retaliate; we get stuck and gain Entangle(1).
For Vixen’s Defence we roll T4+8/1; a defence of 1.
The Spiderwing is exhausted so only does a basic attack for 3HP. However, because Vixen is Entangled(1) it gains a Boosted attack, and draws a loot card checking the bottom right hand corner; no bonus. Vixen is dealt 3HP damage, less one for her defence and less one for light armour; 11HP (12-1).
The Entangle status cools down and is removed.
At the end of Round 3 all exhausted enemies refresh; Enemy Recovery.
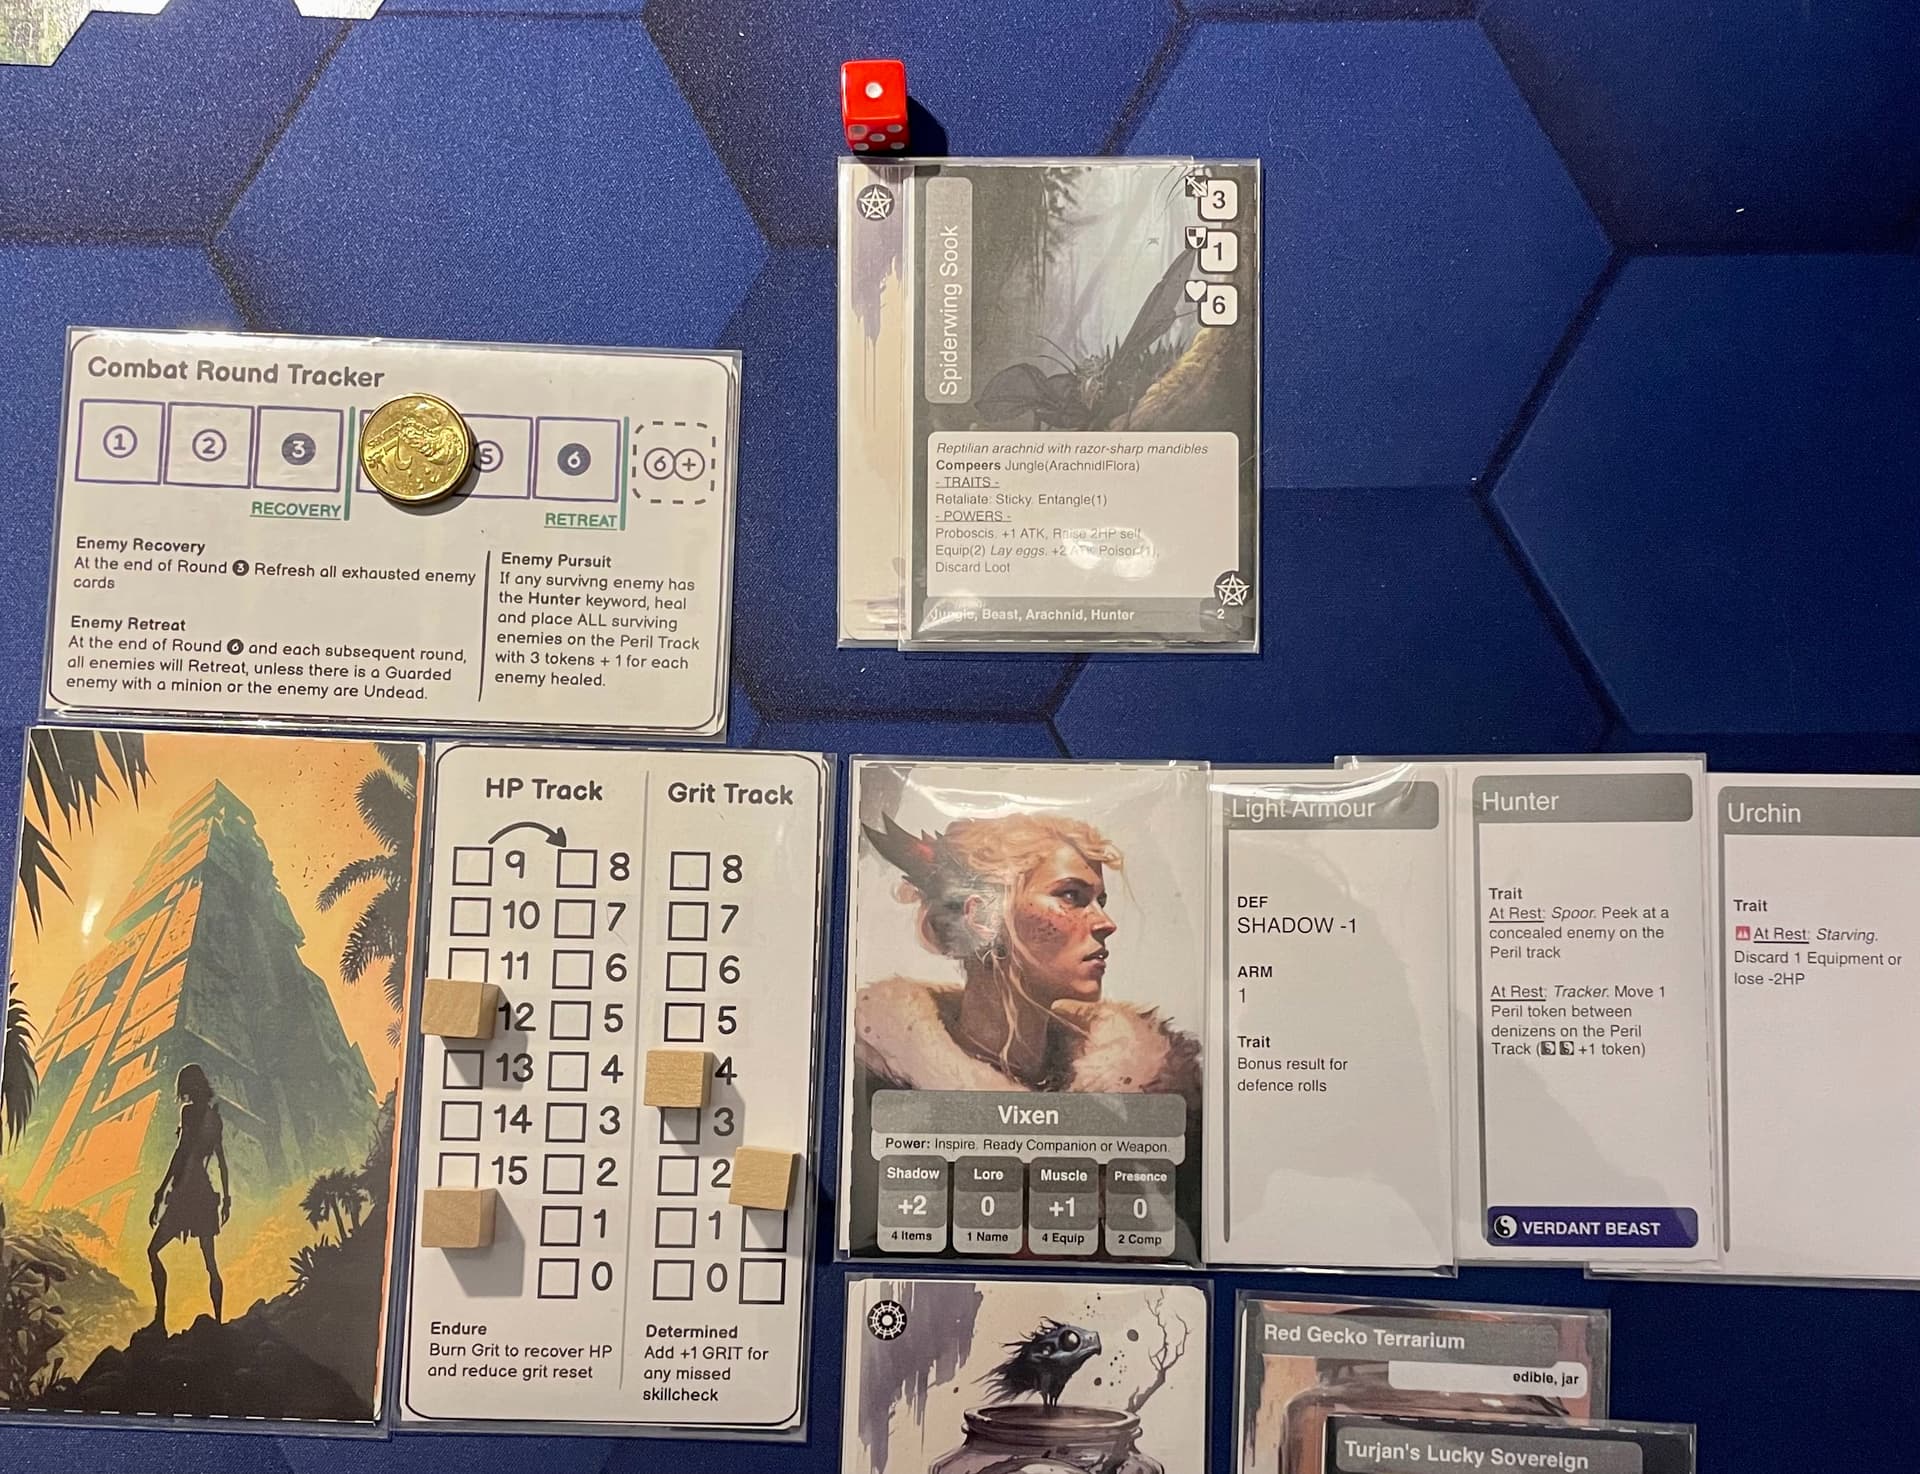
Round 3
The Spiderwing is ready and has 1HP.Vixen attacks with her Axe (+1 MOD from MUSCLE) T5+3/2; a result of 3HP. The Spider is dead!
Vixen immediately gains the Loot card, and decides to reveal it for an item; hmm.. a throwing knife, could come in handy.
The Spiderwing denizen card becomes a Memory, but for the tutorial we immediately discard Memories, and so we place it at the back of the Jungle faction deck.
Rest Phase
Vixen chooses to Press On again.
Peril Phase
Vixen checks the Peril track and there is nothing to process.
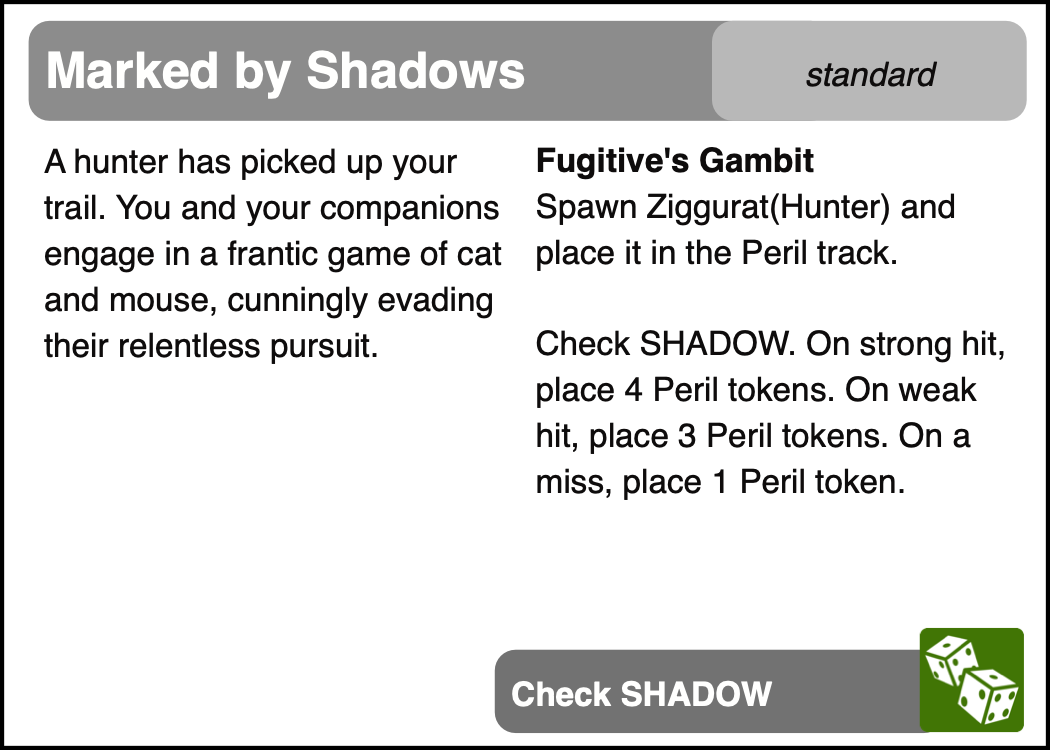
Next Vixen draws a Peril card and resolves the encounter.
Vixen checks for Threat Escalation and whether or not we have exceeded any party limits. All good.
Turn 3
Movement Phase
Vixen Scouts and places Map 12: Secluded Glade with a Movement 0.
Explore Phase

Vixen draws a matching location encounter, and after reading the intro is confronted with a PERIL decision; PERIL: Wedge the clam open (discard 1 Equipment) or tear your leg free.
Vixen has Equipment (face down loot card in inventory) and gives it up to Wedge the Clam.
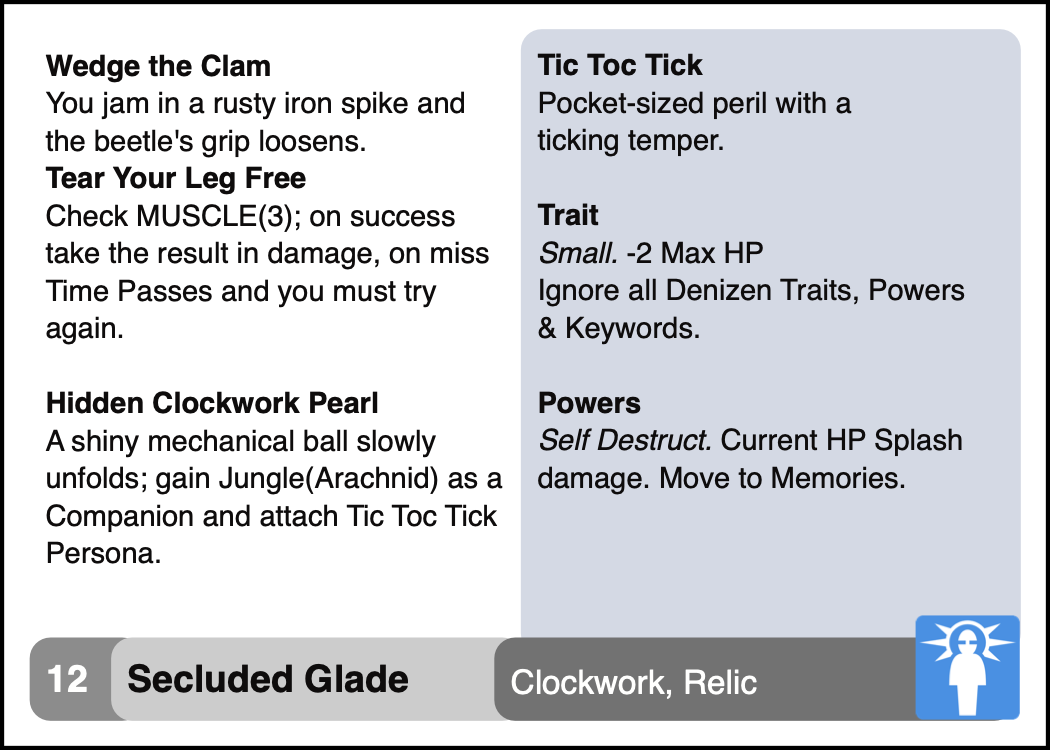
Vixen opens the jungle clam and discovers a mysterious mechanism within. Drawing the next Arachnid card from the Jungle faction, Vixen gains a companion and attaches the location encounter as a Persona then places Tic Toc Tick into the Player Tableau.
Rest Phase
Vixen chooses to Press On again.
Peril Phase
Vixen checks the Peril track and there is nothing to process.
Next Vixen draws a Peril card and resolves the encounter.
Turn X
Movement Phase
Explore Phase
Rest Phase
Peril Phase
Rinse and repeat.